Caching Proxy
Note
Make sure to install os-squid via in order to use
the web proxy. As of OPNsense 24.1, the proxy is no longer included in the default installation.
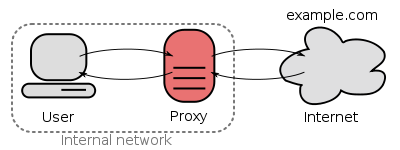
OPNsense is equipped with a fully featured forward caching (transparent) proxy. A caching proxy reduces bandwidth and improves response times by caching and reusing frequently-requested web pages. The Access Control Lists can be utilized for user authentication and or as (category based) web filter.
Features include:
Multi Interface Support
Transparent Mode (including SSL/HTTPS)
ICAP Support for Anti Virus/Malware Engine
HTTP Proxy
FTP Proxy
User Authentication
Access Control Lists (valid for both http(s) and ftp)
(Compressed) Blacklist
Category Based Web Filtering
Can be combined with traffic shaper
Authenticators
User authentication can be done using OPNsense standard and built-in authenticators. Currently these include:
LDAP (incl. Microsoft Active Directory)
Radius
Local user manager
No authentication
These options can be found in the section.
Access Control
OPNsense supports fine grained access control, which can be configured in containing the following (Advanced) options:
Subnets
Ports
MIME types
Banned IP’s
Whitelists
Blacklists
Browser/User Agents
Traffic Management
The proxy can be combined with the traffic shaper and take full advantage of its shaping features. Additionally it includes its own options:
Maximum download size
Maximum upload size
Overall bandwidth throttling
Per host bandwidth throttling
These options can be found in the section.
Category Based Web Filter
No need for additional plugins, such as squidGuard - as OPNsense has built-in category based web filter support. Main features include:
Fetch from a remote URL
Supports flat file list and category based compressed lists
Automatically convert category based blacklists to squid ACLs
Keep up to date with the built-in scheduler
Compatible with most popular blacklist
Transparent Mode
The transparent mode means all requests will be diverted to the proxy without any configuration on your client. Transparent mode works very well with unsecured http requests, however with secured (SSL) HTTPS connection the proxy will become a man-in-the-middle as the client will “talk” to the proxy and the proxy will encrypt the traffic with its master key that the client is required to trust.
Warning
Using a transparent HTTPS proxy can be a dangerous practice and may not be allowed by the services you use, for instance e-banking.
WPAD And PAC
If a transparent proxy cannot be used, OPNsense still supports automatic proxy configuration via WPAD / PAC.
Warning
WPAD via DNS requires the web interface to run on the default HTTP port (TCP/80) which is also a security risk (MITM attacks). In such cases you should proxy the connection or avoid configuring the appliance from an untrusted network.
Custom error pages
Error pages can be customized for your own needs. In order to do so, go to and select “Custom” in “User error pages”, after which an additional tab will be visible named “Error Pages”.
Go to this tab and use the top download icon to receive a zip file containing all available error pages and associated cascading style sheets.After altering the files, zip them again and upload using the file selector option on the same tab followed by the upload button .
The reset button can be used to remove your custom template from the configuration, after which the download option would return the standard OPNsense template.
There are some rules to take into account when creating custom themed error pages:
extend the
errorpage.cssfile to theme your pagesmake sure error pages don’t require anything else than css, images should be converted to base64 and provided inline. Not only is this faster to handle than separate image files it also prevents rendering issues in case images can’t be accessed.
only existing error pages will be processed, if filenames won’t match, the files won’t be written to disk. you can use the download button to inspect what’s being deployed (it will return a combined set of custom and standard files)
it’s best not to include files that are not altered, this saves room in the configurartion and prevents defaults from being overwritten.
Tip
If you only want to change the background image, it’s usually enough to upload the css file in a directory and leave out all the html files.
Tip
To convert images to inline base64 tags, there are quite some online tools available, which can easily be found using google.
As an example, our logo can be found in the the css file looking like background: url('data:image/svg+xml;base64,PD9...) no-repeat left;
Configuration / How-tos
More information on how to utilize OPNsense’s proxy service can be found in: