Setup Caching Proxy
Enable / Disable
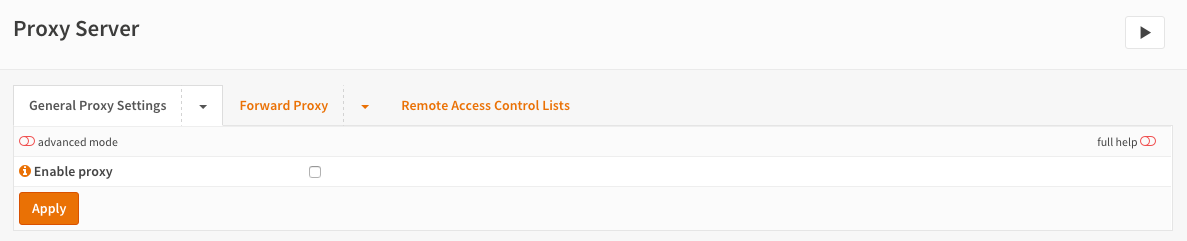
The proxy is delivered with sane default settings for easy setup. To enable the proxy just go to and check Enable proxy then click on Apply. The default will enable the proxy with User Authentication based on the local user database and runs on port 3128 of the lan interface.
Change Proxy Interfaces
If you want to change the interfaces (subnets) the proxy will bind to then click on the tab Forward Proxy. Now add/remove the interfaces in the Proxy interfaces field.
Change Proxy Listening Port
By default the proxy will listen at port 3128, you can change this by clicking on the tab Forward Proxy and fill in the port in the Proxy port field. Don’t forget to Apply your changes.
Enable Cache
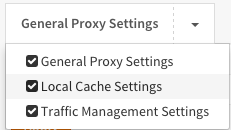
To enable caching click on the arrow next to the General Proxy Settings to see the dropdown menu and click on Local Cache Settings.
Check the Enable local cache and click Apply.
Important
As the cache is not created by default you will need to stop and start the service under , this will ensure correct creation of the cache.
Advanced
Under the advanced settings (see mode switch on left top of the form) you can change the cache size, directory structure and max object size to keep in cache. Again defaults are fine for normal browsing and creates a 100 MB cache with max 4 MB object size.
Change Authentication Method
Click on the arrow next to the Forward Proxy tab to show the drop down menu. Now select Authentication Settings and select the desired Authenticator(s) in the field Authentication method. Click on Clear All if you do not want to use any authentication.
Depending on the Authentication Servers you have setup under You can select one or more of the following:
No Authentication (leave field blank)
Local User Database
LDAP
Radius
FTP Proxy
To enable the FTP Proxy click on the arrow next to the Forward Proxy tab to show the drop down menu. Now select FTP Proxy Settings and select one or more interfaces in the FTP proxy interfaces field and Apply.
Note
The FTP proxy will only function if the Proxy Server itself is enabled. And the proxy only works for non encrypted ftp traffic.
Access Control List
You can setup ACLs by clicking on the arrow next to Forward Proxy and select Access Control List. Here you can:
Setup Allowed Subnets (By default the proxy interfaces will be allowed)
Add Unrestricted IP addresses (Unrestricted means just that, no authentication and no blacklisting for those IPs)
Add Banned hosts IP address (A ban will stop this client from being able to use the proxy)
Whitelist (Click on the (i) to see examples, whitelist prevail above blacklists)
Blacklist (If not allowed by a whitelist, this will block traffic based upon a regular expression)
Warning
Don’t forget to press Enter or a comma after filling in a tag field as otherwise the value will not be applied. It should look similar to:

Remote Black List / Ad Blocking
Use simple flat files to block ads. For this sample we will use the ad list found here:
http://pgl.yoyo.org/adservers/serverlist.php?hostformat=nohtml
This list is a simple flat list that looks like this:
101com.com
101order.com
123found.com
180hits.de
180searchassistant.com
1x1rank.com
207.net
247media.com
Go to and click on the tab Remote Access Control Lists
Now click on the + at the bottom right corner of the form to add a new list.
Fill in:
Enabled |
Checked |
Enable/Disable |
Filename |
yoyoads |
Choose a unique filename |
URL |
(copy/paste the URL) |
The URL of the blacklist |
categories |
(Leave blank) |
Used for Category based web filtering |
Description |
Yoyo Ads Blacklist |
Your description |
Looks like (screenshots of version 16.1.4):
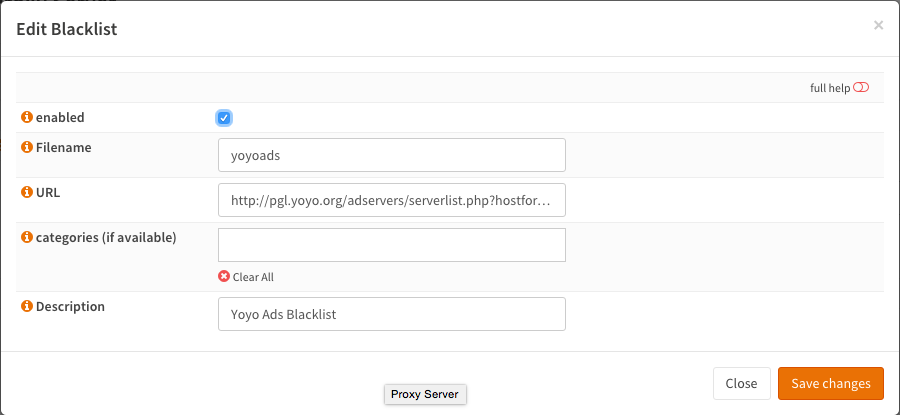
Save changes
Now click on Download ACLSs & Apply to enable the blacklist/ad blocker.
Firewall Rule No Proxy Bypass
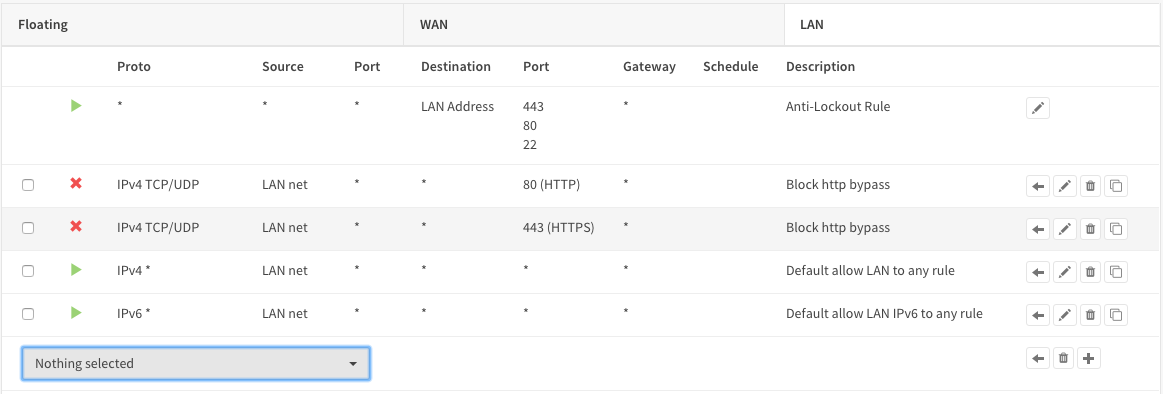
To make sure no-one can bypass the proxy you need to add a firewall rule. Go to and add the following to the top of the list rule on the LAN interface (if LAN is where your clients and proxy are on).
Action |
Block |
Interface |
LAN |
Protocol |
TCP/UDP |
Source |
LAN net |
Destination Port Range |
HTTP |
Category |
Block Proxy Bypass |
Description |
Block HTTP bypass |
Save
And one more rule to block HTTPS access:
Action |
Block |
Interface |
LAN |
Protocol |
TCP/UDP |
Source |
LAN net |
Destination Port Range |
HTTPS |
Category |
Block Proxy Bypass |
Description |
Block HTTPS bypass |
Save & Apply changes
Configure Browser/Firefox
To configure you browser for use with the proxy, just go to your network settings and configure a proxy like this in firefox:

For a set-for-step guide on full category based web filtering see Setup Web Filtering.