Traceability of configuration changes using Git
When seeking a solution to keep full traceability of configuration changes made by (various) users on your firewall, the git-backup plugin might be a useful addition to your setup.
In order to use this feature, one has to install the git-backup plugin first (in search for os-git-backup).
Concept
Since git backup is a little bit different than the standard backup options available, we will explain briefly how it works using the diagram below.
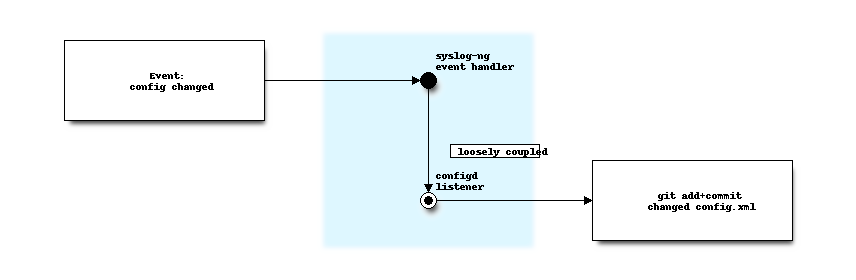
When config.xml changes happen due to user or api interaction, an event is triggered to which handlers can subscribe
(using syshook).
Our git-backup plugin subscribes to these events in order to add the received backups and commits these with
information extracted from the received xml file. To prevent the system to lock during backups,
we choose this loosely coupled method. Events which are yet unprocessed are being left in the (existing) backup directory.
Note
Events are processed from the moment the initial backup is configured, when disabling backups, the (local) changelog itself remains active.
Git backup will push collected commits to the upstream repository nightly. To shorten this default interval, a custom cronjob (see Settings) can be set up, selecting Remote Backup as the Command. The regular backup procedure (which is also being triggered using the test button in the user interface) is responsible for initialising the empty local repository and configuring the upstream target.
Note
One can always change the upstream target, as long as the newly configured one is either empty (has absolutely no history - otherwise said, be a new one, absolutely untouched), or has the exact same history (otherwise said, be an exact copy, git history included) as the one used on this firewall.
Initial setup
The configuration part of this plugin is quite basic and offers two types of transport modes, https using a username and password combination or ssh using public key infrastructure.
Enable |
Enable backup to the upstream target |
URL |
Target location, which defined transport protocol, options as ssh://server/project.git or https://server/project.git are allowed here. |
Branch |
The branch to push your commits to on the configured url |
SSH private key |
When using ssh, make sure to add a private key here |
User Name |
Username, when using gitlab and ssh, the default is |
password |
When using https authentication, choose a password here. |
Force Push |
Enable force push to overwrite the remote repository with the local state. See “Conflict resolution” below for details. |
Make sure to push to an empty (as in, new and never used) upstream repository, when pressing “Setup/Test Git” the initial commits should be sent to your git server.
SSH Setup
If you use GitHub, then your only option for git-backup, is to configure it for SSH access since GitHub has removed the ability for external applications to log into your account via your username and password.
The fields in OPNSense under System / Configuration / Backups / Git should contain the following:
URL absolutely MUST follow this format when using GitHub and GitLab:
ssh://github.com/user_name/repo_name.git. Any URL string that does not follow this pattern will not work.SSH Private key (discussed below)
User Name should ONLY contain the word
gitpassword: leave this field empty
You need to create your repository BEFORE enabling git-backup. Do not add any files or READMEs to the repository. In other words, create a BLANK repository.
Next, create a new SSH key specifically for git-backup (only generate the private / public keys per that document and skip the rest). It is imperative that you do not add a password to your key, or your backups will fail with authentication errors.
You should set up SSH access to just your repository by assigning your SSH public key to the repository instead of assigning it to your GitHub / GitLab account. Doing this ensures that you don’t arbitrarily expose more of your git resources to OPNSense than is absolutely necessary for git-backup to work properly.
If you use GitHub, you can add your SSH public key by going to your repository, then click on settings, then Deploy keys. Or you can go straight to the URL using this format: https://github.com/USER_NAME/REPOSITORY_NAME/settings/keys/new.
Check the box
Allow write Access.
Make sure the fields are populated as stated above and that the Enable box is checked, then click on Setup / Test Git and you should see a message come back at the top of the page indicating that the first backup was successful.
Tip
When choosing an non-existing remote branch one will be created automatically. An existing one needs to be empty (blank) on order to use it, which in practice is only possible when creating the repository for the first time.
Conflict resolution
From the user interface no conflict resolution is offered, you need to configure an upstream repository and stick to it for the lifetime of the firewall. When for some reason a backup needs to be restored and one would like to stick to the same git repository, manual conflict resolution might be an option. Support on these scenarios is not offered.
The repository is available on the OPNsense machine in the following directory /conf/backup/git.
Note
Conflict resolution can complicate the solution a lot (merging, fast-forward, ….), for this reason we will not accept feature requests trying to push to existing (used) repositories.
Using Force Push
When the local and remote repositories diverge (for example after restoring a configuration via the GUI), synchronization will fail with a git out of sync error. The Force Push option can be used to resolve this by overwriting the remote with the local repository state.
Warning
Force pushing permanently overwrites the remote repository history with your local state. Any commits that exist remotely but not locally will be lost.
To resolve a divergence:
Navigate to
Enable the Force Push option
Click Setup/Test Git to push the current state
(Optional) Disable Force Push and click Setup/Test Git again to verify normal operation
The Force Push option can also be left enabled permanently to ensure the remote always mirrors the local state.
For manual conflict resolution, access the repository in /conf/backup/git and use standard git commands.
Error handling
When errors occur these will be written to the normal system logging, search for git-backup in the general
system logging ().
Some standard errors might be returned via the test button, which should provide a clear direction, known ones are:
authentication failure -> username/password combination is not valid or the provided ssh key doesn’t match the expected one
ssh hostkey changed -> it looks like a man-in-the-middle attack is happening, if that’s not the case and the remote identification changed for valid reasons, manual intervention is required (remove the offensive key from
/root/.ssh/known_hosts)git out of sync -> unable to synchronize, see “Conflict resolution” for additional info.
Cleanup
The repository is saved locally on the firewall in /conf/backup/git, if for some reason one would like to remove the
collected history and start over from scratch, one can safely remove this directory.
Login using a (ssh) console and remove the git directory in that case (rm -rf /conf/backup/git)
Note
As long as the plugin is installed and /conf/backup/git contains a git repository, the changes will be captured (also without an upstream). One could use this knowledge as well to keep a local (only) repository by creating a repository without assigning an upstream and leave the backup option disabled.
Tip
The firewall contains a local backup of the most recent changes (configured in )
which the config changed event handler uses to feed to the consumers. If after a cleanup one would like to flush
the collected changes again to the upstream provider, the /conf/event_config_changed.json could be removed
to “forget” about the already handled config events (in which case all backups will be signaled again to all config syshook handlers)