Initial Installation & Configuration
Note
Just looking for how to invoke the installer? When the live environment has been started, log in with user installer and password opnsense.
Index
Architecture
The software setup and installation of OPNsense® is available for the x86-64 microprocessor architecture only.
Embedded vs Full
OPNsense offers two Image types with all major releases: embedded and full images. The Embedded Image is intended for environments where preinstalling the storage media is required due to a lack of local resources on the firewall like storage, and/or console access (VGA/Serial). The image is tailored to reduce write cycles as well, but the image can be used anywhere. Another reason for the Embedded Image is to eliminate the need for local console access for installing OPNsense. Installation is managed by prewriting the image to a storage device, installing the storage device, and booting the system.
Full Images provide installation tools like OPNsense Importer, Live Environment, and Installer. Full Images are released to support different console/hardware installation requirements.
Both image types can be installed and run from virtual disks (VM), SD memory cards, USB disks, solid-state disks (SSD), or hard disk drives (HDD).
The main differences between embedded and full images are:
Embedded |
Full |
|---|---|
Writes to RAM disk |
Writes to local disk |
No log data retention after reboot |
Log data retention after reboot |
Not intended for local disk writes |
Suitable for disk writes. |
Embedded only use, SWAP file is optional |
Can enable RAM disk for embedded mode. |
The embedded image stores logging and cache data in memory only, while full versions will keep the data stored on the local drive. A full version can mimic the behavior of an embedded version by enabling RAM disks, which is especially useful for SD memory card installations.
Warning
See the chapter Hardware Sizing & Setup for further information on hardware requirements prior to an install.
Installation Images
Depending on your hardware and use case, different installation options are available:
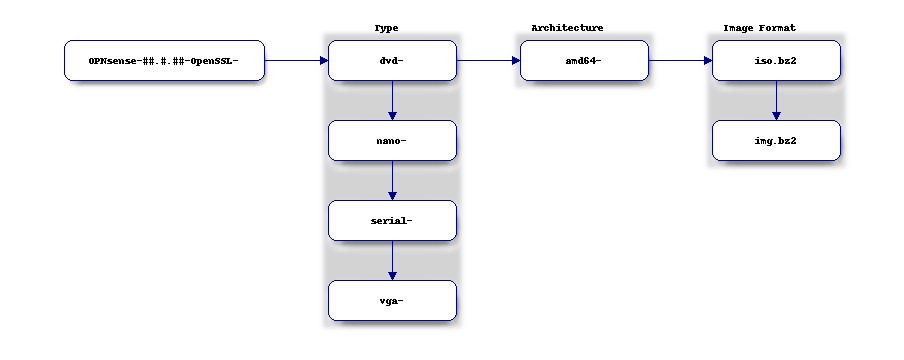
Type |
Description |
Image Type |
|---|---|---|
dvd |
ISO image boots into a live environment in VGA-only mode with UEFI support |
Full |
vga |
USB image boots into a live environment in VGA-only mode with UEFI support |
Full |
serial |
USB image boots into live environment running in serial console (115200) mode only with UEFI support |
Full |
nano |
Image for preinstalling onto >=4 GB USB drives, SD, or CF cards for use with embedded devices running in serial console (115200) mode with secondary VGA support (no kernel messages though) |
Embedded |
Note
All Full Image types can run both OPNsense Importer before booting into the Live environment and also run Installer once booted into the Live environment.
Warning
Flash memory cards will only tolerate a limited number of writes and re-writes. For the Nano image, /var/log and /tmp are memory disks by default to prolong the lifetimes of CF/SD cards and SSDs in special cases.
To enable non-embedded versions: Go to , change the setting, then reboot. Consider enabling an external syslog server as well.
Image Filename Composition
Note
Please be aware that the latest installation media does not always correspond with the latest released version available. OPNsense installation images are provided on a scheduled basis with major release versions in January and July. More information on our release schedule is available from our package repository, see README. We are encouraged to update OPNsense after installation to be on the latest release available, see Update Page.
Download and Verification
The OPNsense distribution can be downloaded from one of our mirrors.
OpenSSL is used for image file verification. 4 files are needed for verification process:
The SHA-256 checksum file (<filename>.sha256)
The bzip-compressed image file (<filename>.<image>.bz2)
The signature file for the uncompressed image file (<filename>.<image>.sig)
The OpenSSL public key (<filename>.pub)
Use one of the OPNsense mirrors to download these files:
Go to the bottom of OPNsense download page.
Click one of the available mirrors closest to your location.
Download one of each file mentioned above for your Image type.
The OpenSSL public key (.pub) is required to verify against. Although the file is available on the mirror’s repository, you should not trust the copy there. Download it, open it up, and verify the public key matches the one from other sources. If it does not, the mirror may have been hacked, or you may be the victim of a man-in-the-middle attack. Some other sources to get the public key from include:
https://pkg.opnsense.org (/<FreeBSD:<version>:<architecture>/<release version>/sets/changelog.txz)
Note
Only major release announcements for images contain the public key, and update release announcements will not. i.e. 22.1 will have a copy of the public key in the release announcement, but 22.1.9 will not.
Once you download all the required files and verify that the public key matches the public key found in one of the alternate sources listed above, you can be relatively confident that the key has not been tampered with. To verify the downloaded image, run the following commands (substituting the filenames in brackets for the files you downloaded):
openssl sha256 OPNsense-<filename>.bz2
Match the checksum command output with the checksum values in the file OPNsense-<version>-OpenSSL-checksums-amd64.sha256.
If the checksums don’t match, redownload your image file.
If the checksums match, continue with the verification commands.
openssl base64 -d -in OPNsense-<filename>.<image>.sig -out /tmp/image.sig
openssl dgst -sha256 -verify OPNsense-<filename>.pub -signature /tmp/image.sig OPNsense-<filename>.<image>
Warning
Make sure to unpack the image using bunzip2 before verifying. Our signatures are generated before compressing them
(as of OPNsense version 24.1)
If the output of the second command is “Verified OK”, your image file was verified successfully, and it is safe to install from it. Any other outputs, and you may need to check your commands for errors, or the image file may have been compromised.
Installation Media
Now that you have downloaded and verified the installation image from above, you must unpack the image file before you can write the image to disk. For Unix-like OSes use the following command:
bzip2 -d OPNsense-<filename>.bz2
For Windows use an application like 7zip. The .bz2 will
be removed from the end of the filename after command/application completes.
After unpacking the image you can create the installation media. The easiest method to install OPNsense is to use the USB “vga” Image. If your target platform has a serial console interface choose the “serial” image. If you need to know more about using the serial console interface, consult the serial access how-to.
Write the image to a USB flash drive (>=1 GB) or hard disk, using either dd for Unix-like OSes or, for Windows, physdiskwrite, Etcher, or Rufus.
FreeBSD
dd if=OPNsense-##.#.##-[Type]-[Architecture].img of=/dev/daX bs=16k
Where X = the device number of your USB flash drive (check dmesg)
OpenBSD
dd if=OPNsense-##.#.##-[Type]-[Architecture].img of=/dev/rsd6c bs=16k
The device must be the ENTIRE device (in Windows/DOS language: the ‘C’ partition), and a raw I/O device (the ‘r’ in front of the device “sd6”), not a block mode device.
Linux
sudo dd if=OPNsense-##.#.##-[Type]-[Architecture].img of=/dev/sdX bs=16k
where X = the IDE device name of your USB flash drive (check with hdparm -i /dev/sdX) (ignore the warning about trailing garbage - it’s because of the digital signature)
macOS
sudo dd if=OPNsense-##.#.##-[Type]-[Architecture].img of=/dev/rdiskX bs=64k
where r = raw device, and where X = the disk device number of your CF card (check Disk Utility) (ignore the warning about trailing garbage - it’s because of the digital signature)
Windows
physdiskwrite -u OPNsense-##.#.##-[Type]-[Architecture].img
(use v0.3 or later!)
System Boot Preparation
After preparing the installation media, we need to make sure we can access the console (either via keyboard and [virtual]monitor or serial connectivity). Next we need to know how to access the boot menu or the system BIOS (UEFI) to boot from the installation media. In most cases, it will be a function (F#), Del, or ESC key that needs to pressed immediately after powering on (or rebooting) the system. Usually within the first 2 to 3 seconds from powering up.
Tip
OPNsense devices from the OPNsense shop use <ESC> to enter the BIOS and boot selection
options.
Note
Serial connectivity settings for DECXXXX devices can be found here
Installation Instructions
Install Instructions
OPNsense installation boot process allows us to run several optional configuration steps. The boot process was designed to always boot into the live environment, allowing us to access the GUI or even SSH directly. If a timeout was missed, restart the boot procedure.
OPNsense Importer
All Full Images have the OPNsense Importer feature that offers flexibility in recovering failed firewalls, testing new releases without overwriting the current installation by running the new version in memory with the existing configuration or migrating configurations to new hardware installations. Using Importer is slightly different between previous installs with existing configurations on disk vs new installations/migrations.
For systems that have OPNsense installed and the configuration intact, here is the process:
Boot the system with installation media
Press any key when you see “Press any key to start the configuration importer”.
If you see the login prompt, you have passed the importer and will need to reboot.
Type the device name of the existing drive that contains the configuration and press enter.
If Importer is successful, the boot process will continue into the live environment using the stored configuration on disk.
If Importer was unsuccessful, we will be returned to the device selection prompt. Confirm the device name is correct and try again. Otherwise, there may be possible disk corruption and restoring from backup.
At this point, the system will boot up with a fully functional firewall in live environment using existing configuration but will not overwrite the previous installation. Use this feature for safely previewing or testing upgrades.
For new installations or migrations, follow this process:
We must have a 2nd USB drive formatted with FAT or FAT32 File system.
Preferable non-bootable USB drive.
Create a conf directory on the root of the USB drive
Place an unencrypted <downloaded backup>.xml into /conf and rename the file to config.xml (
/conf/config.xml)Put both the Installation media and the 2nd USB drive into the system and power up / reboot.
Boot the system from the OPNsense Installation media via Boot Menu or BIOS (UEFI).
Press any key when you see: “Press any key to start the configuration importer”
Type the device name of the 2nd USB Drive, e.g. da0 or nvd0 , and press Enter.
If Importer is successful, the boot process will continue into the Live environment using the configuration stored on the USB drive.
If unsuccessful, the importer will error and return to the device selection prompt. In this case, repeat steps 1-3 again.
Live Environment
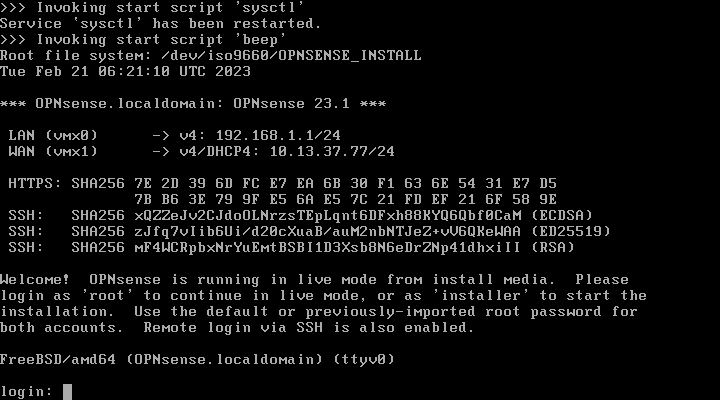
After booting with an OPNsense Full Image (DVD, VGA, Serial), the firewall will be in the Live environment with and without the use of OPNsense Importer. We can interact with the Live environment via Local Console, GUI (HTTPS), or SSH.
By default, we can log into the shell using the user root with the password
opnsense to operate the live environment via the local console.
The GUI is accessible at https://192.168.1.1/ using Username:
root Password: opnsense by default (unless a previous configuration was imported).
Using SSH we can access the firewall at IP 192.168.1.1 . Both the root and installer users are available with the password specified above.
Note
The installation media is read-only, which means your current live configuration will be lost after reboot.
Continue to OPNsense Installer to install OPNsense to the local storage device.
OPNsense Installer
Note
To invoke the installer, log in with user installer and password opnsense
After successfully booting up with the OPNsense Full Image (DVD, VGA, Serial),
the firewall will be at the Live Environment’s login: prompt. To start the
installation process, login with the user installer and password opnsense.
If Importer was used to import an existing configuration, the installer and root
user password will be the root password from the imported configuration.
If the installer user does not work, log in as user root and select: 8) Shell
from the menu and type opnsense-installer. The opnsense-importer can also
be run this way should you need to rerun the import.
The installer can always be run to clone an existing system, even for Nano images. This can be useful for creating live backups for later recovery.
Tip
The installer can also be started from an internal host using SSH. The default IP
address is 192.168.1.1
Attention
When installing an appliance with SD or MMC flash card storage, ensure you select the UFS filesystem
and choose mmcsd0 in the Disk Selection. Do not choose da0 as that is the USB drive.
As an example, this is applicable to the DEC677 Desktop Security Appliance.
The installation process involves the following steps:
Keymap selection - The default configuration should be fine for most occasions.
Install (UFS|ZFS) - Choose UFS or ZFS filesystem. ZFS is in most cases the best option as it is the most reliable option, but it does require enough capacity (a couple of gigabytes at least).
Partitioning (ZFS) - Choose a device type. The default option (stripe) is usually acceptable when using a single disk.
Disk Selection (ZFS) - Select the Storage device e.g.
da0ornvd0Last Chance! - Select Yes to continue with partitioning and to format the disk. However, doing so will destroy the contents of the disk.
Continue with recommended swap (UFS) - Yes is usually fine here unless the install target is very small (< 16GB)
Select Root Password - Change and confirm the new root password
Select Complete Install - Exits the installer and reboots the machine. The system is now installed and ready for initial configuration.
Warning
You will lose all files on the installation disk. If another disk is to be used then choose a Custom installation instead of the Quick/Easy Install.
Nano Image
To use the nano image follow this process:
Create the system disk by using the Nano image. See Installation Media how to write the nano image to disk.
Install the system disk drive into the system.
Configure the system (BIOS) to boot from this disk.
After the system boots, the firewall is ready to be configured.
Using the nano image for embedded systems, your firewall is already up and running. The configuration settings to enable Memory Disks (RAM disks) that minimize write cycles to relevant partitions by mounting these partitions in system memory and reporting features are disabled by default.
Initial Configuration
After installation, the system will prompt you for the interface assignment. If you ignore this, then the default settings will be applied. Installation ends with the login prompt.
By default you have to log in to enter the console.
Welcome message
* * * Welcome to OPNsense [OPNsense 15.7.25 (amd64/OpenSSL) on OPNsense * * *

WAN (em1)     -> v4/DHCP4: 192.168.2.100/24
LAN (em0)     -> v4: 192.168.1.1/24

FreeBSD/10.1 (OPNsense.localdomain) (ttyv0)

login:
Tip
A user can login to the console menu with his credentials. The default credentials after a fresh install are username “root” and password “opnsense”.
- VLANs and assigning interfaces
If you choose to do manual interface assignment or when no config file can be found then you are asked to assign Interfaces and VLANs. VLANs are optional. If you do not need VLANs then choose no. You can always configure VLANs at a later time.
- LAN, WAN and optional interfaces
The first interface is the LAN interface. Type the appropriate interface name, for example “em0”. The second interface is the WAN interface. Type the appropriate interface name, e.g. “em1” . Possible additional interfaces can be assigned as OPT interfaces. If you assigned all your interfaces you can press [ENTER] and confirm the settings. OPNsense will configure your system and present the login prompt when finished.
- Minimum installation actions
In case of a minimum install setup (i.e. on CF cards), OPNsense can be run with all standard features, except for the ones that require disk writes, e.g. a caching proxy like Squid. Do not create a swap slice, but a RAM Disk instead. In the GUI enable and set the size to 100-128 MB or more, depending on your available RAM. Afterwards reboot.
Enable RAM disk manually
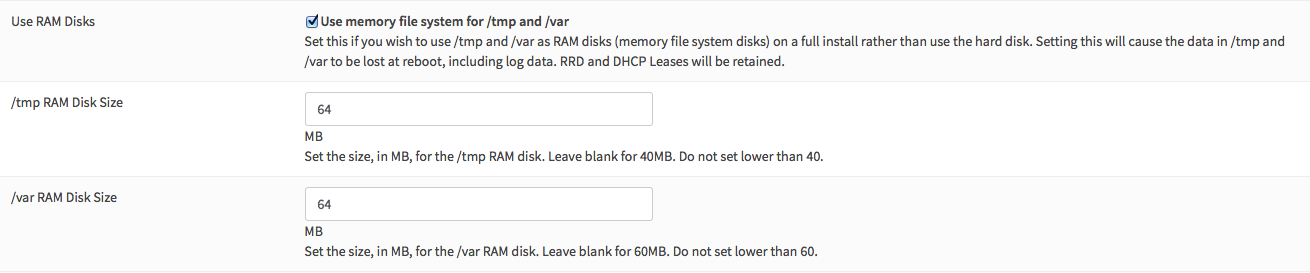
Then via console, check your /etc/fstab and make sure your primary partition has rw,noatime instead of just rw.
Console
The console menu shows 13 options.
0)     Logout                              7)      Ping host
1)     Assign interfaces                   8)      Shell
2)     Set interface(s) IP address         9)      pfTop
3)     Reset the root password             10)     Filter logs
4)     Reset to factory defaults           11)     Restart web interface
5)     Reboot system                       12)     Upgrade from console
6)     Halt system                         13)     Restore a configuration
Table: The console menu
opnsense-update
OPNsense features a command line interface (CLI) tool “opnsense-update”. Via menu option 8) Shell, the user can get to the shell and use opnsense-update.
For help, type man opnsense-update and press [Enter].
Upgrade from console
The other method to upgrade the system is via console option 12) Upgrade from console
GUI
An update can be done through the GUI via .