Access / Servers / LDAP
LDAP is the lightweight directory access protocol used by Microsoft Active Directory (AD), OpenLDAP and Novell eDirectory, to name a few.
OPNsense can use an LDAP server for authentication purposes and for authorization to access (parts) of the graphical user interface (web configurator). When using LDAP for the GUI the privileges have to be defined with the local user manager, to do so an (automated) import of the users from the LDAP source is required.
In this how-to we will show you how to configure both using Microsoft Active Directory Server. If you only need LDAP for services like VPN, then you can skip steps 3-5.
Tip
LDAP can also be combined with Two-factor authentication
Prerequisites
A functional LDAP server (example is based on MS AD) is required. Your OPNsense firewall needs to be fully configured and able to access the LDAP server.
Step 1 - Add New LDAP server
To add a new LDAP server as authentication source, go to and click on Add server in the top right corner, just above the form.
Enter the following information:
Descriptive name |
ws2012 |
Enter a descriptive name |
Type |
LDAP |
Select LDAP |
Hostname or IP address |
10.10.10.1 |
Enter the IP address of you LDAP Server |
Port value |
389 |
Enter the port number, 389 is default |
Transport |
TCP - Standard |
Select Standard or Encrypted |
Protocol version |
3 |
Select protocol version |
Bind credentials |
||
User DN: |
cn=testusr,CN=Users, DC=opnsense,DC=local |
Enter your credentials |
Password: |
secret |
always use a strong password |
Search scope |
Entire Subtree |
Select Entire Subtree to retrieve all |
Base DN: |
DC=opnsense,DC=local |
Enter the Base DN |
Authentication containers |
Select |
Click & Select the containers from the list |
Extended Query |
objectClass=Person |
Extend query, e.g. limit results to Persons |
Initial Template |
MicrosoftAD |
Select your LDAP Server Type |
User naming attribute |
samAccountName |
Auto filled in based upon Initial Template |
Read properties |
Fetch account details after successful login |
|
Synchronize groups |
Enable to Synchronize groups, requires the option above |
|
Constraint groups |
Only consider groups inside the Authentication containers |
|
Limit groups |
Select list of groups that may be considered during sync* |
|
Automatic user creation |
When groups are automatically synchronized, this offers the ability to automatically create the user when it doesn’t exist. |
|
Match case insensitive |
Allow mixed case input when gathering local user settings. |
Note
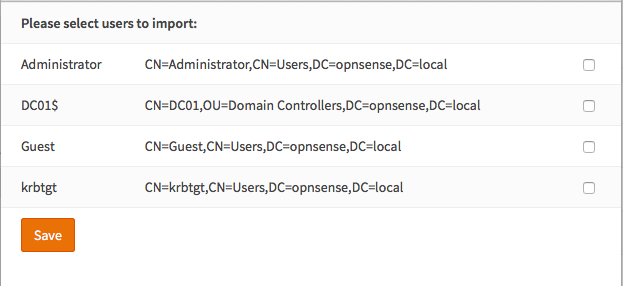
When clicking on the Select button right next to Authentication containers, something similar to the following will show up:
Note
When using SSL/TLS, make sure the certificate authority of the remote server is configured in the section.
Tip
The Extended Query can be used to select users who are member of a specific group (only relevant for external services, when not using the local user database). One can use something like this: memberOf=CN=myGroup,CN=Users,DC=opnsense,DC=local to select only members of the group “myGroup”. To add a user to a specific group under Windows just edit the groups properties and select Add… to add the user under the tab Members.

Tip
In some cases local naming doesn’t match server naming when it comes to users, the case insensitive option can
be used in that case to ignore case on login. Microsoft Access Directory for example doesn’t match case sensitive,
in which case UsEr equals user (our system is case sensitive)
Step 1.1 (optional) Synchronize groups.
When using the local database to import users, you can also synchronize configured LDAP groups when the remote server
supports this. To use this feature, enable Read properties and Synchronize groups.
Note
This feature needs the remote LDAP server to respond with memberOf when queried, how to enable this on
various LDAP providers lies outside the scope of this manual.
Note
Groups will be extracted from the first CN= section and will only be considered when already existing in OPNsense.
Group memberships will be persisted in OPNsense
(you can always check which rights the user had the last time he or she successfully logged in).
Tip
When users may not exist yet in the local database, you can also create them automatically after successful login, use the “Automatic user creation” option to arrange this.
Step 2 - Test
To test if the server is configured correctly, go to and select your LDAP server and enter a valid username + password. Click on Test and if everything is set up correctly it will show:

Note
When limited to just one group, the group name will not be shown in the listing.
If not (or your entered invalid credentials) it shows:

Tip
When Read properties is enabled, you should also see all properties returned by the server in the tester. This
helps to identify if your server support group sync support (find memberOf in the list).
Step 3 - Enable the authentication server
Go to and under the Authentication section at the bottom, change the Server dropdown to your newly added LDAP server and save.
Warning
Before changing the gui access to require LDAP, make sure at least one user is allowed to access the
firewall with remote credentials. This can be achieved either by adding the All pages privilege to the
user or making sure the user is member of a group with that privilege.
To prevent being locked out, you can add “Local Database” as secondary option during your test.