Configuring Cellular Modems
OPNsense supports a wide range of USB and miniPCIe cellular modems that can be used as primary internet (WAN) connection or as failover for a fixed/ethernet connection.
With this guide we show you how to easily add a new modem and configure it to be used as primary WAN connection.
Supported devices
In general, OPNsense should support all cellular modems that are supported by the respective FreeBSD kernel (see latest <https://cgit.freebsd.org/src/tree/sys/dev/usb/serial/u3g.c#n197>). However, not all devices behave the same way, you might have to tweak your card with specific AT commands, for example in the init string.
The screenshots in this guide are for a Huawei ME909u-521 miniPCIe cellular modem.
Choosing the right hardware
Depending on the country you want to use the modem in, you might need a different cellular modem. mPCIe cards are rather expensive so make sure you get a device that supports the LTE bands of the country and provider you want to work with. Use websites like FrequencyCheck to find the frequency band(s) used and get a cellular modem that supports these frequencies.
You should also buy an appropriate pigtail antenna cable and LTE antenna. Note that LTE antennas often have different connectors than Wi-Fi antennas, chose your equipment accordingly. Getting the right antenna has a big impact on the quality of your signal. For LTE, MIMO (multiple input, multiple output) antennas should be considered, see for example this guide.
Note
Make sure to connect the antenna to the cellular modem once you start configuring the modem in OPNsense. There is little chance that you get any signal without antenna.
Step 1 - Talking to the cellular modem
First, we need to figure out what device is accepting AT commands on your modem. For
the Huawei modem used in this example the device is /dev/cuaU0.0, other modems
might provide the AT interface on another device.
On FreeBSD, /dev/cuauN devices are call-out ports that are used for modems instead
of terminals, see section 26.2.1 in the FreeBSD manual.
The best way to locate the correct port is to send AT commands to it. This can be
tested using the utility cu:
cu -l /dev/cuaU0.2
Connected
AT (<-type that)
OK
Once you see Connected type AT. If you do not get an OK
back, enter ~. to quit and try the next device. In this particular example, a
Sierra Wireless MC7430 card was used and /dev/cuaU0.2 is the only device where
we get OK back.
Now, check if a SIM card is available and can be accessed:
cu -l /dev/cuaU0.2
Connected
AT+CPIN?
+CPIN: READY
There are multiple things that can go wrong here, the SIM card might not have been detected or you might have a pin on the SIM.
Once the SIM card is ready, quit cu with ~..
Note
To get rid of the pin, first check if it is valid with AT+CPIN="1234"
where 1234 is the pin of your SIM card. To get rid of the pin, enter
AT+CLCK="SC",0,"1234". The pin should now be gone.
Note
If you never get a READY after AT+CPIN? you might want to play with
the different mPCIe slots on your system. In my case on a PC Engines APU
board and a Sierra Wireless card I had to switch slots until the SIM card
was detected properly. The middle one did the trick for me, if someone
understands how or why this is happening, please add your findings to this
documentation. Also, APU boards have more than one SIM slot, try both slots
in case the first option did not work.
Step 2 - Configure Point to Point device
Go to and click on Add in the upper right corner of the form.
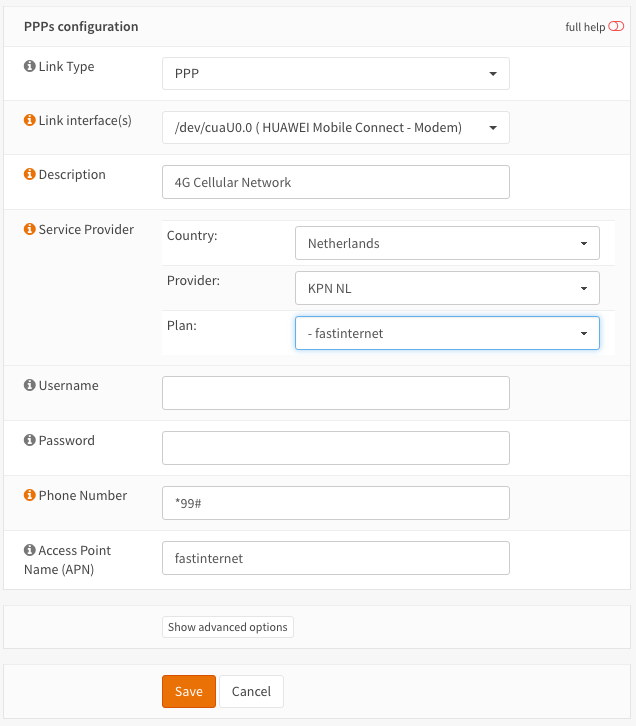
Fill in the form like this (Example is for Dutch Mobile 4G KPN Subscription):
Link Type |
PPP |
Link interface(s) |
/dev/cuaU0.0 ( HUAWEI Mobile Connect - Modem) |
Description |
4G Cellular Network |
Service Provider |
Select Country, Provider & Plan for auto configuration |
Username |
Leave Empty (for NL KPN) |
Password |
Leave Empty (for NL KPN) |
Phone Number |
*99# (for NL KPN) |
Access Point Name (APN) |
fastinternet (for NL KPN 4G) |
If you need to enter a PIN number, then click on Advanced Options
Click Save to apply the settings.

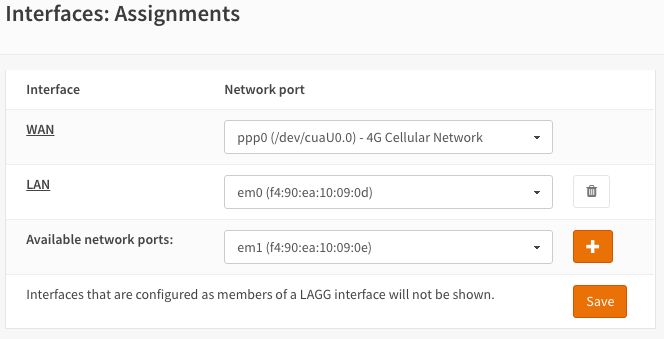
Step 3 - Assign the WAN interface
To assign the interface go to in our case we will make this our primary internet connection and change the WAN assignment accordingly.
To do so just change the Network port for WAN to ppp0 (/dev/cuaU0.0) - 4G Cellular Network.
No click Save below the form.
If everything went fine, then you are all set, and the default gateway will be the one of you cellular connection.
Step 4 - Troubleshooting
In case it still does not work, first look at the log of the cellular device’s PPP connection, to do so go to: . If you are lucky you can see what went wrong directly in the log. Unfortunately, the PPP log is not very informative so it might not help at all.
If you can’t figure out what is wrong, then a reboot to reinitialize the device can sometimes help. This seems particularly true on embedded devices, better reboot once too much and if you got lost in the options, a factory reset to start from scratch is a good idea too. In our experience playing with SIM cards from different providers required factory resets (for whatever reason) to get them to work properly.
Note
As mentioned above, the SIM card needs to be available. See the hints in the first step of this tutorial to make sure everything is prepared properly.
Note
Some Sierra Wireless modems still seem to need a specific init string to work
properly. One that seems to work for multiple users and LTE cards is &F0E1Q0 +CMEE=2. In any case you should first try without init string and only give it
a try if you could not get any connection without. You can add this in
.
When the device seems to work properly then checkout if the interface was assigned an IP address, go to and click on the WAN interface to see the details.
You should see an IP address, Gateway IP and ISP DNS server(s). If all is filled in, then either your firewall is blocking the traffic or the network connection is not working well.
In case you were not successful, you might have to check manually what is going on. Read the Troubleshooting PPP Connections section in the FreeBSD manual for more information and consult the OPNsense support forum.