IPsec VTI - connect to Microsoft Azure
Microsoft Azure offers three VPN types:
policy-based (restricted to a single S2S connection)
route-based
route-based with BGP (not available in the virtual network gateway SKU “Basic”)
This how-to covers setting up a route-based S2S VPN.
Before you start
Before starting with the configuration of an IPsec tunnel you need to have a working OPNsense installation and an Azure virtual network setup with a unique LAN IP subnets for each side of your connection (your local networks need to be different from your remote networks).
For setting up a Microsoft Azure virtual network and virtual network gateway refer to the Microsoft Azure documentation:
Sample Setup
This sample configuration uses an OPNsense box and the basic Azure virtual network gateway, with the following configuration:
Azure
Hostname |
Azure |
Virtual Network Gateway Public IP |
4.3.2.1 |
Virtual Network Address Space |
192.168.2.0/24 |
Firewall Rules OPNsense
To allow IPsec tunnel connections, the following should be allowed on WAN for on sites (under ):
Protocol ESP
UDP Traffic on port 500 (ISAKMP)
UDP Traffic on port 4500 (NAT-T)

Note
You can further limit the traffic by the source IP of the remote host.
Step 1 - Phase 1 OPNsense
(Under Press +) We will use the following settings:
General information
Connection method |
Respond only |
|
Key Exchange version |
V2 |
|
Internet Protocol |
IPv4 |
|
Interface |
WAN |
Choose the interface connected to the internet |
Remote gateway |
4.3.2.1 |
The public IP address of your Azure virtual network |
Description |
IPsec Azure |
Freely chosen description |
Phase 1 proposal (Authentication)
Authentication method |
Mutual PSK |
Using a Pre-shared Key |
My identifier |
My IP address |
Simple identification for fixed IP |
Peer identifier |
Peer IP address |
Simple identification for fixed IP |
Pre-Shared Key |
At4aDMOAOub2NwT6gMHA |
Random key. CREATE YOUR OWN! |
Phase 1 proposal (Algorithms)
Encryption algorithm |
AES 256 |
refer to Azure docs for details |
Hash algorithm |
SHA256 |
|
DH key group |
2 (1024 bit) |
|
Lifetime |
28800 sec |
Lifetime before renegotiation |
Note
Possible parameters are listed here: https://docs.microsoft.com/en-us/azure/vpn-gateway/vpn-gateway-about-vpn-devices
Advanced Options
Install Policy |
Unchecked |
This has to be unchecked since we want plain routing |
Disable Rekey |
Unchecked |
Renegotiate when connection is about to expire |
Disable Reauth |
Unchecked |
For IKEv2 only re-authenticate peer on rekeying |
NAT Traversal |
Disable |
For IKEv2 NAT traversal is always enabled |
Dead Peer Detection |
Unchecked |
Save your setting by pressing:

Step 2 - Phase 2 OPNsense
Press the button + in front of the phase 1 entry to add a new phase 2.
As we do not define a local and remote network, we just use tunnel addresses,
you might already know from OpenVPN. In this example we use 10.111.1.1 and
10.111.1.2. These will be the gateway addresses used for routing
General information
Mode |
Route-based |
Select Route-based |
Description |
Azure VNET |
Freely chosen description |
Tunnel Network
Local Address |
Local Tunnel IP |
Set IP 10.111.1.1 |
Remote Address |
Remote Tunnel IP |
Set IP 10.111.1.2 |
Phase 2 proposal (SA/Key Exchange)
Protocol |
ESP |
Choose ESP for encryption |
Encryption algorithms |
AES / 256 |
refer to Azure docs for details |
Hash algorithms |
SHA256 |
|
PFS Key group |
off |
Not supported |
Lifetime |
27000 sec |
Save your settings by pressing:
Enable IPsec for OPNsense, select:
Save:
And apply changes:


Step 3 - Set MSS Clamping
(Under ) We will use the following settings:
Setup
MSS |
1350 |
Required |
Leave the other settings as per default.
Save:
You are almost done configuring OPNsense (only some firewall settings remain, which will be addressed later). We will now proceed setting up Azure.
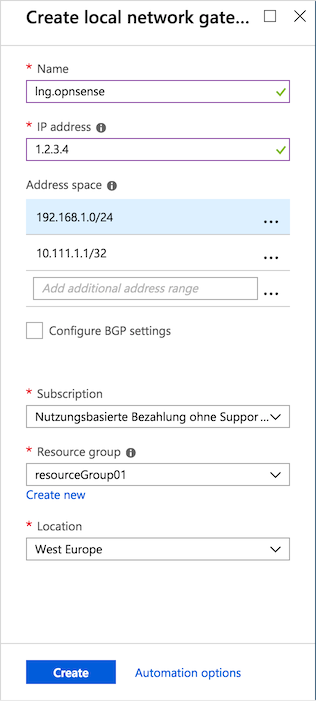
Step 4 - Azure: Setup local network gateway
(Under All resources press + Add, then search and Create Local network gateway) We will use the following settings:
Setup
Name |
lng.opnsense |
Freely chosen name |
IP address |
1.2.3.4 |
The public IP address of your remote OPNsense |
Address space |
192.168.1.0/24 |
LAN Network |
Address space |
10.111.1.1/32 |
Local Tunnel IP |
Press the button that says ‘Create’:
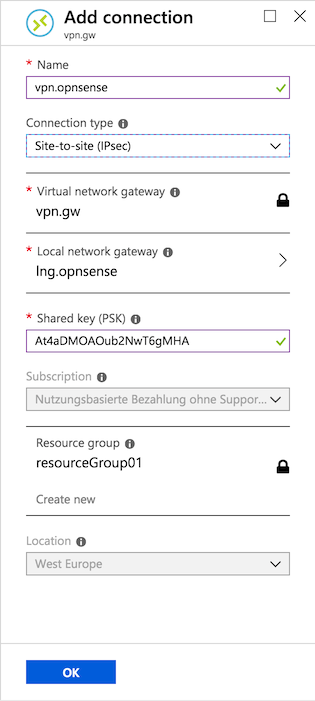
Step 5 - Azure: Setup VPN connection
(Under All resources –> Virtual network gateway –> Connections Press + Add) We will use the following settings:
General setup
Name |
vpn.opnsense |
Freely chosen name |
Connection type |
Site-to-site (IPsec) |
|
Virtual network gateway |
vpn.gw |
Select virtual network gateway |
Local network gateway |
lng.opnsense |
Select local network gateway |
Shared Key (PSK) |
At4aDMOAOub2NwT6gMHA |
Random key. CREATE YOUR OWN! |
Press the button that says ‘OK’:
Firewall Rules OPNsense
To allow traffic passing to your LAN subnet you need to add a rule to the IPsec interface (under ).

IPsec Tunnel Ready
The tunnel should now be up and routing the both networks. Go to to see current status.
Step 6 - Define Gateways
Now that you have the VPN up and running you have to set up a gateway. Go to and add a new gateway.
OPNsense
Name |
VPNGW |
Set a name for your gateway |
Interface |
IPSEC1000 |
Choose the IPsec interface |
IP Address |
10.111.1.2 |
Set the peer IP address |
Far Gateway |
Checked |
This has to be checked as it is a point-to-point connection |