IPsec - NAT before IPsec
Index
Network topology
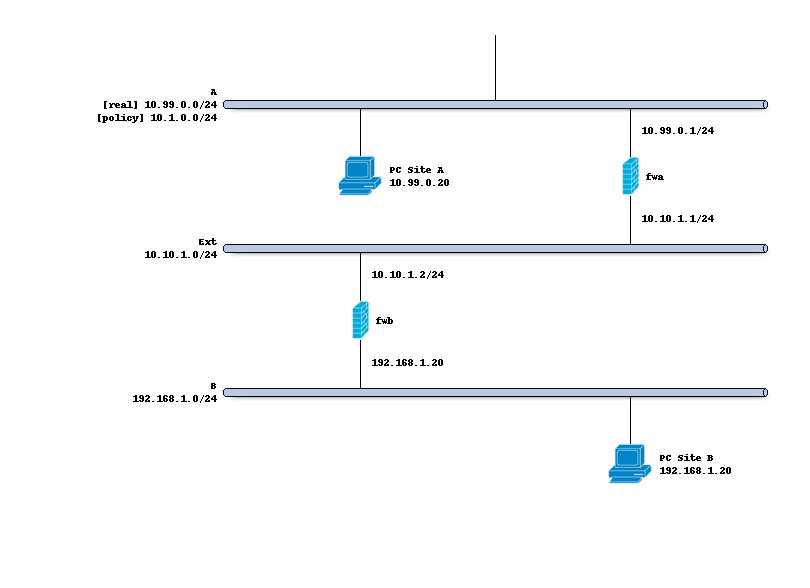
The schema below describes the situation we are implementing.
Two networks (A,B) to peer both firewalls, where the Ipsec policy includes 10.1.0.0/24 <-> 192.168.1.0/24,
but locally side A uses 10.99.0.0/24.
How to setup the tunnel itself is explained in the IPsec - Policy based public key setup document.
Preparations
Make sure the tunnel is up and running before trying out the NAT part, then edit the child entry and input a Reqid
there which isn’t used in any of the other tunnels. For this example we choose 100 here.
Note
It’s imperative to choose a static number here in order to be able to bind policies to the current tunnel.
Add manual security policies
In order for IPsec to trust the local network (10.99.0.0/24) a manual policy needs to be added, go to
the “Manual” tab in . Next add a new entry containing the following items:
Property |
site A |
|---|---|
Reqid |
100 |
Source network |
10.0.99.0/24 |
Tip
When the “Destination network” is left empty, the other end (in this case 192.168.1.0/24) will be received from the tunnel. In case multiple networks exist in the same child policy it’s better to define which one this entry belongs too.
Tip
After changing manual security policies, make sure the tunnel is reconnected (restart or disconnect and connect) as the registration is being arranged using an updown event
Note
Some scenario’s require multiple clients being connected to the same “child” (such as mobile), when the other
end pushes it’s network (destination), it is possible to hook to the correct connection by connecting the
manual policy directly to the connection child. In these cases the reqid is dynamic (leave blank) in the
connection child. The “Child” option can be used for these manual policies.
Configure NAT
To map the networks, we will use a one to one rule created from the menu option. The following settings apply here:
Property |
site A |
Notes |
|---|---|---|
Interface |
IPsec |
|
Type |
BINAT |
Two way mapping |
External network |
10.1.0.0 |
As defined in the child connection |
Source |
10.99.0.0/24 |
The local network |
Destination |
192.168.1.0/24 |
The remote network |
Note
When using BINAT all networks need to be equally sized (/24 in this case)