Central Management
As part of the OPNsense Business Edition, Deciso offers a plugin to keep all your firewalls up to date and have an easy entry point to manage them.
Index
Installation
After acquiring a license, you can switch to the commercial software repository containing OPNcentral. In order to
install, just go to and search for os-OPNcentral.
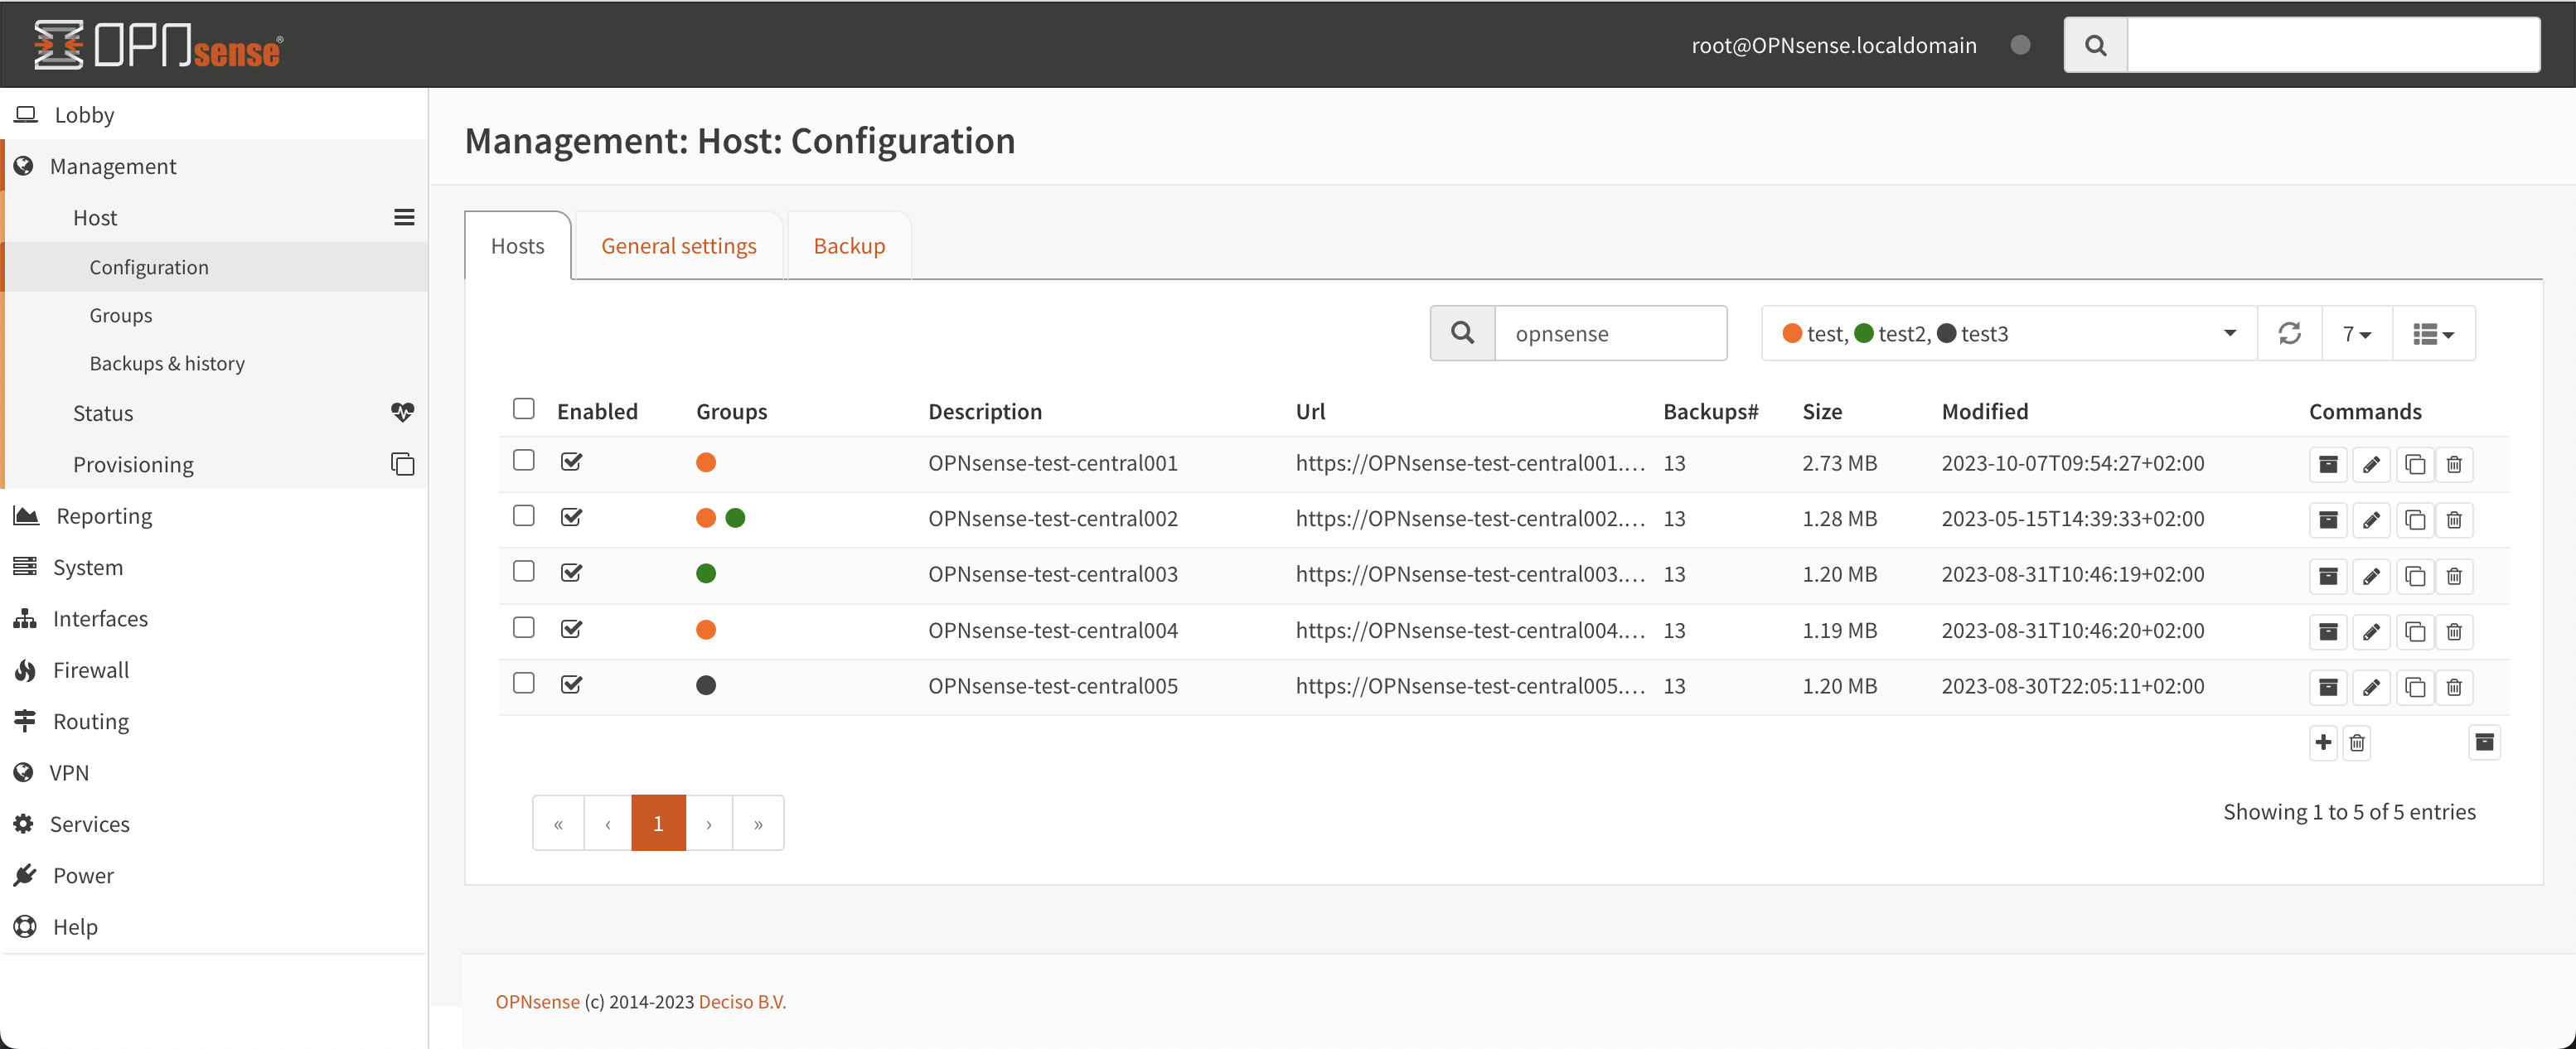
Register new hosts
Before adding a host, you need to generate an API key and secret from the machine you will grant access to. API keys are managed in the user manager (system_usermanager.php), go to the user manager page and select a user. Somewhere down the page you will find the API section for this user.
Click on the + sign to add a new key. When the key is created, you will receive a (single download) with the credentials in one text file (ini formatted). The contents of this file look like this:
key=w86XNZob/8Oq8aC5r0kbNarNtdpoQU781fyoeaOBQsBwkXUt
secret=XeD26XVrJ5ilAc/EmglCRC+0j2e57tRsjHwFepOseySWLM53pJASeTA3
Next go to the Hosts section of the management menu in and add a new host, copy the url from the machine and the API key and secret generated above.
Note
You can disable certificate validation if your using a self-signed certificate, although we advise to generate proper certificates for the machines.
 Icons
IconsGroup membership
Download configuration (or all as a zip file)
Edit host configuration
Clone host configuration
Delete host configuration
Central WebGui certificate management
The host configuration offers an option to link a central certificate to the managed host, in which case
the certificate will be distributed to the host (if WebGui is being provisioned).
Using this feature, you’re able to centrally manage certificates (manually or using ACME) easily.
Tip
Add OPNcentral - provision / reconfigure remote hosts in
with a daily schedule to automatically provision all attached firewalls on a daily basis.
Attention
Do not synchronize Certificates and WebGUI at the same time. Provisioning classes WebGUI
Alter generic host settings
The second tab in the screen contains the setting page which configures defaults for all hosts where applicable.
Option |
Description |
|---|---|
Interfaces |
Select the interfaces of the central node that would be used when merging settings on the remote firewall, only applicable on part of the configuration sections (such as the firewall). See the provisioning section for more details. |
Enable backups |
Enable centralized backups. |
Backups: |
|
|
Number of sequential backups to preserve from remote host (per host), copy of local history to a maximum of X per host. |
|
When an interval is provided, this option determines the period for the interval. e.g. when weekly is specified, each last record of the week is preserved to a maximum of the number of intervals |
|
Non sequential number of backups to keep, last backup of specified interval type is preserved for the number of items specified here. |
Centralized backups
When “Enable backups” is checked in the generic host settings tab OPNcentral will perform a nighly backup of all configured hosts. The host overview () shows the number of backups with their related size and last modification date for each host.
Note
The modification date defines the last time the remote host was changed, so if a host hasn’t been changed for a longer period of time this value would show an older date.
Tip
It is possible to execute the backup manually from the gui. In order to do that, go
to and press the Execute backup button.
Tip
If more frequent backups are desired, just add a cron job in
for the task OPNcentral - backup remote hosts.
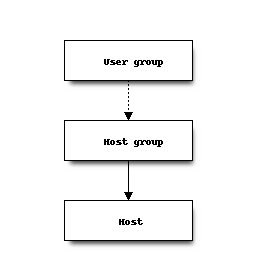
Multi tenancy using host groups
Hosts can be organised in groups using the menu option. By default hosts are accessible by all users having access to the specified OPNcentral menu options. You can change that behaviour by linking a host into one or more groups, where you can constrain access.
Warning
When attaching a host to multiple host groups and want to constraint access, make sure you limit all host groups to avoid accidental access for all OPNcentral users.
Connect to managed machine
On various management pages there are direct links available to login to the firewall in question. Usually connected nodes are shown with a link which opens in a new tab when clicking.
The example below shows a link in the firmware status page which will open https://node1.opnsense.local.

When the management server is allowed to access the OPNcentral components on the connected node it will automatically login after the link is clicked with the proper credentials assigned to the api token user.
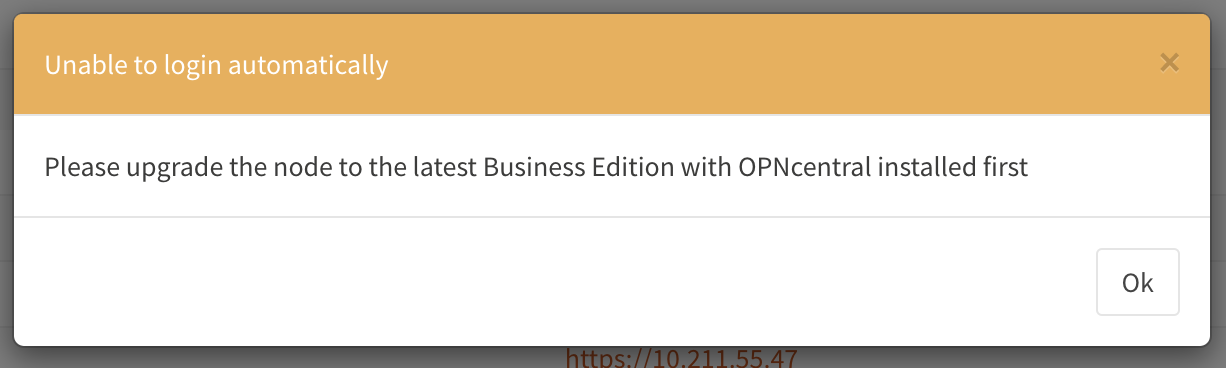
If the latests Business Edition is installed on the managed machine, but access prohibits automatic logins, you will be redirected to the login page.
When the connected machine is not using the business edition, it’s not possible to use the link, a message such as the following will be presented to the user:
Note
Make sure your browser trusts the remote node otherwise the browser can’t access the machine and will signal an issue with the software version.
Machine firmware status / upgrade
All connected and enabled machines can be contacted using the page, when visiting the page all connected machines will automatically be contacted to report their status and installed version.
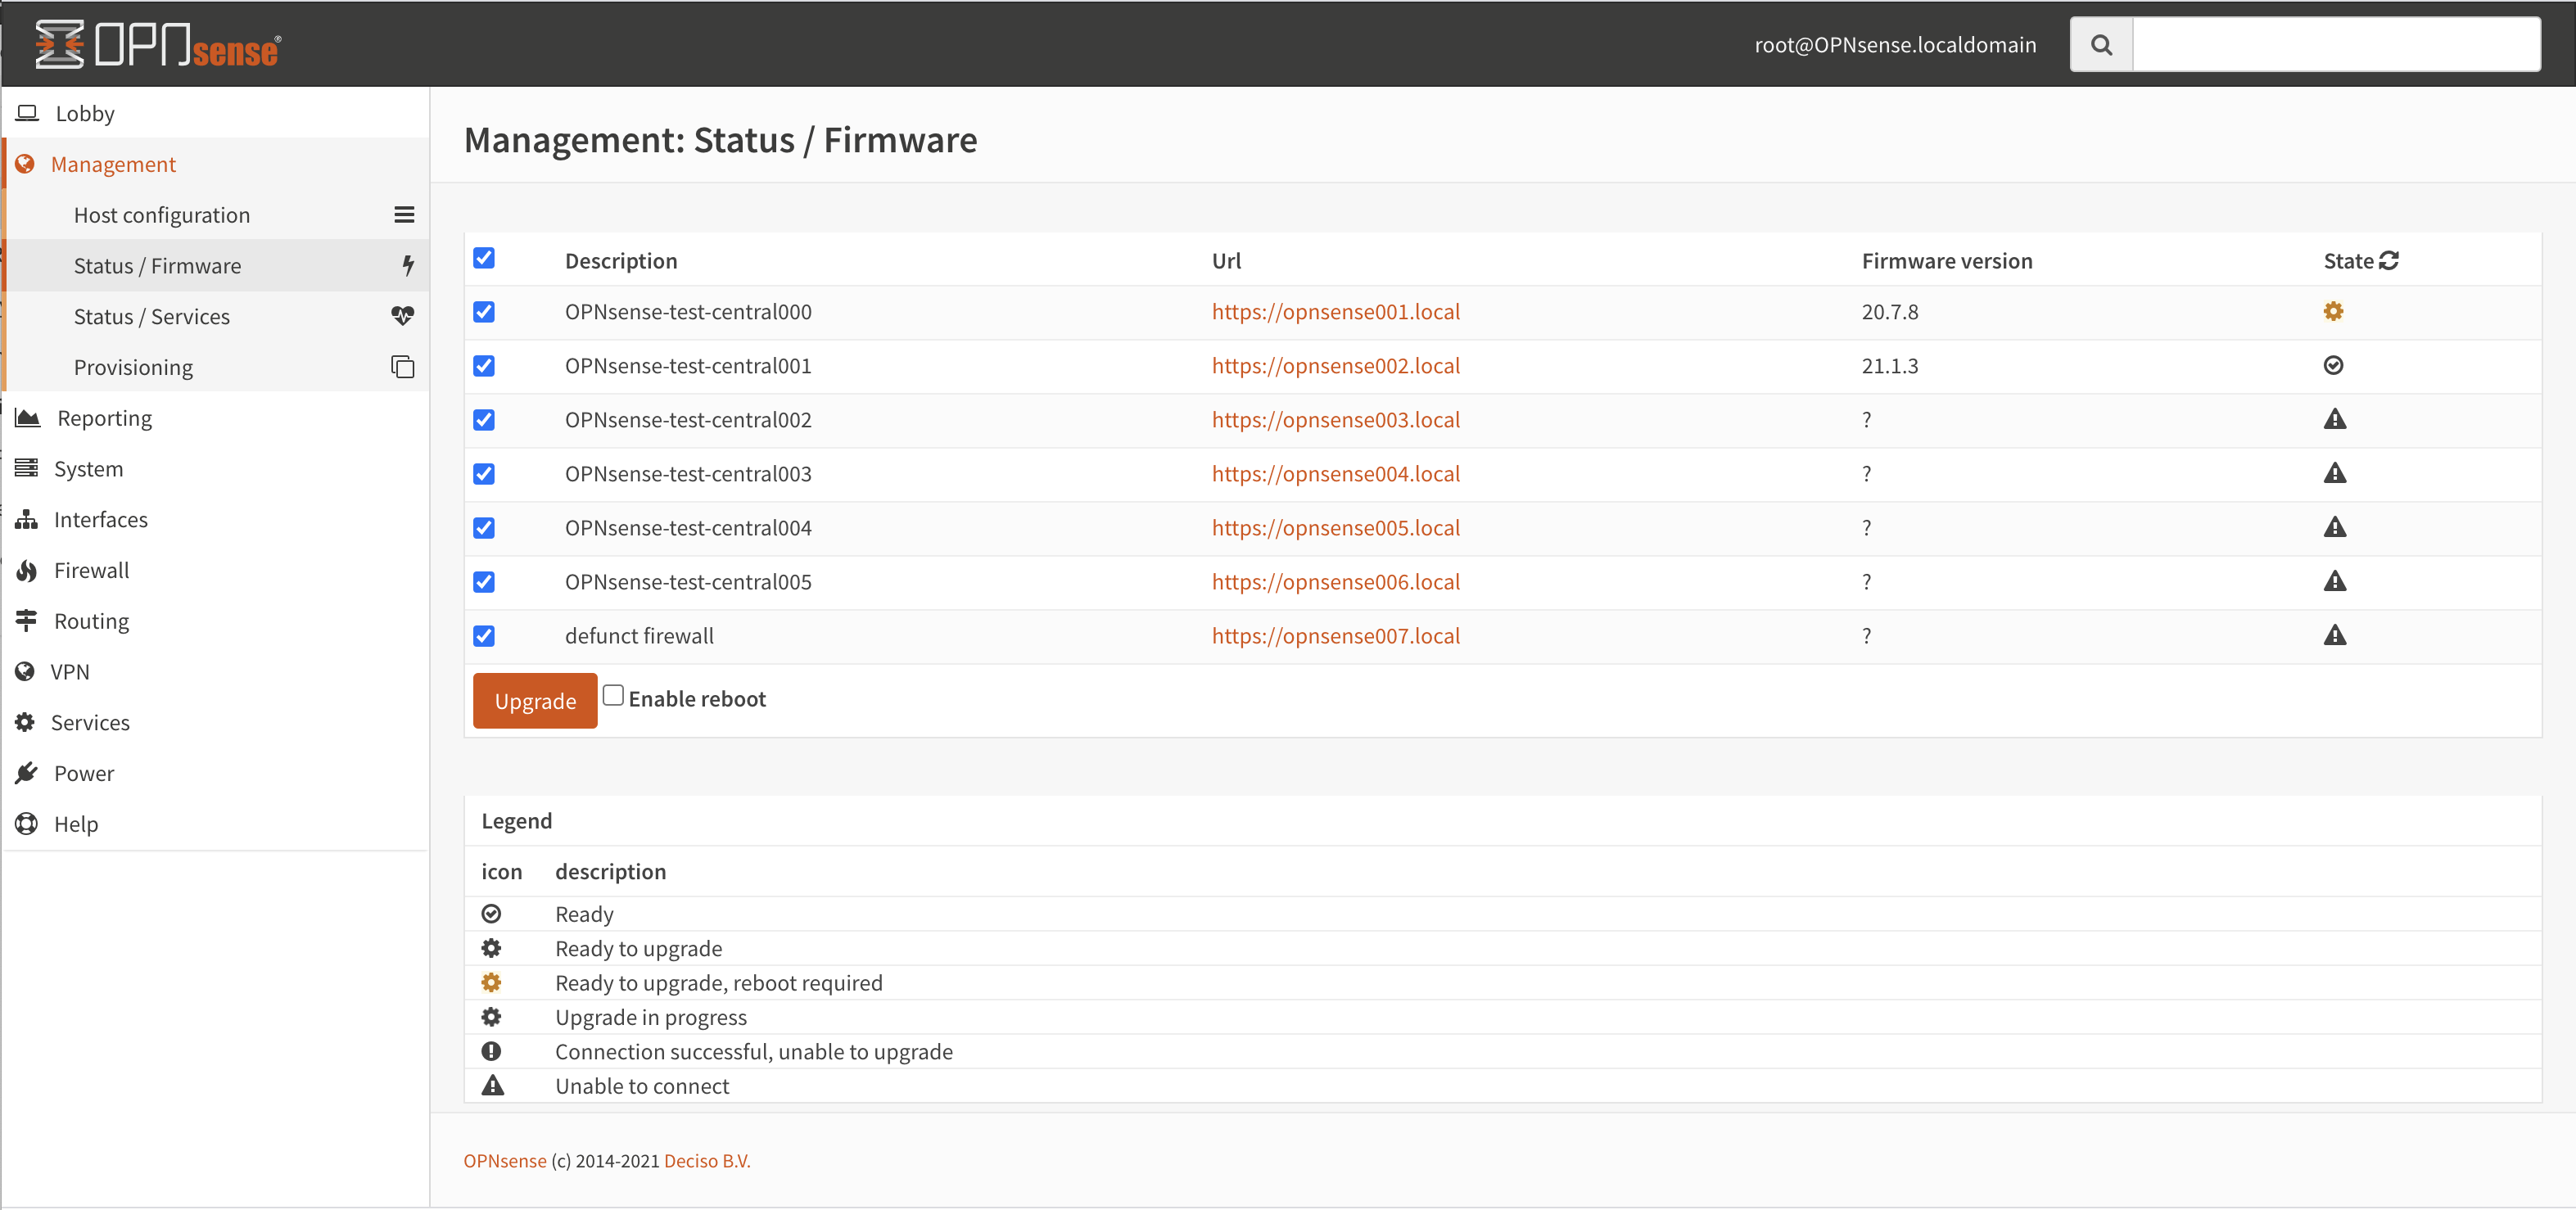
When an update is available, it will be shown in the list, including if this upgrade requires a reboot. The upgrade button starts the upgrade procedure, but will only upgrade machines that will require a reboot if Enable reboot is checked.
Tip
Use the refresh button to request status again.The upgrade wheel starts spinning when an upgrade was requested, since the upgrade itself can consume some time, you can revisit the status page later (or press refresh) to show the new status.
Machine service status and control
The service status and control page provides an overview on all managed OPNsense firewalls connected to OPNcentral and offers the ability to restart services when needed.
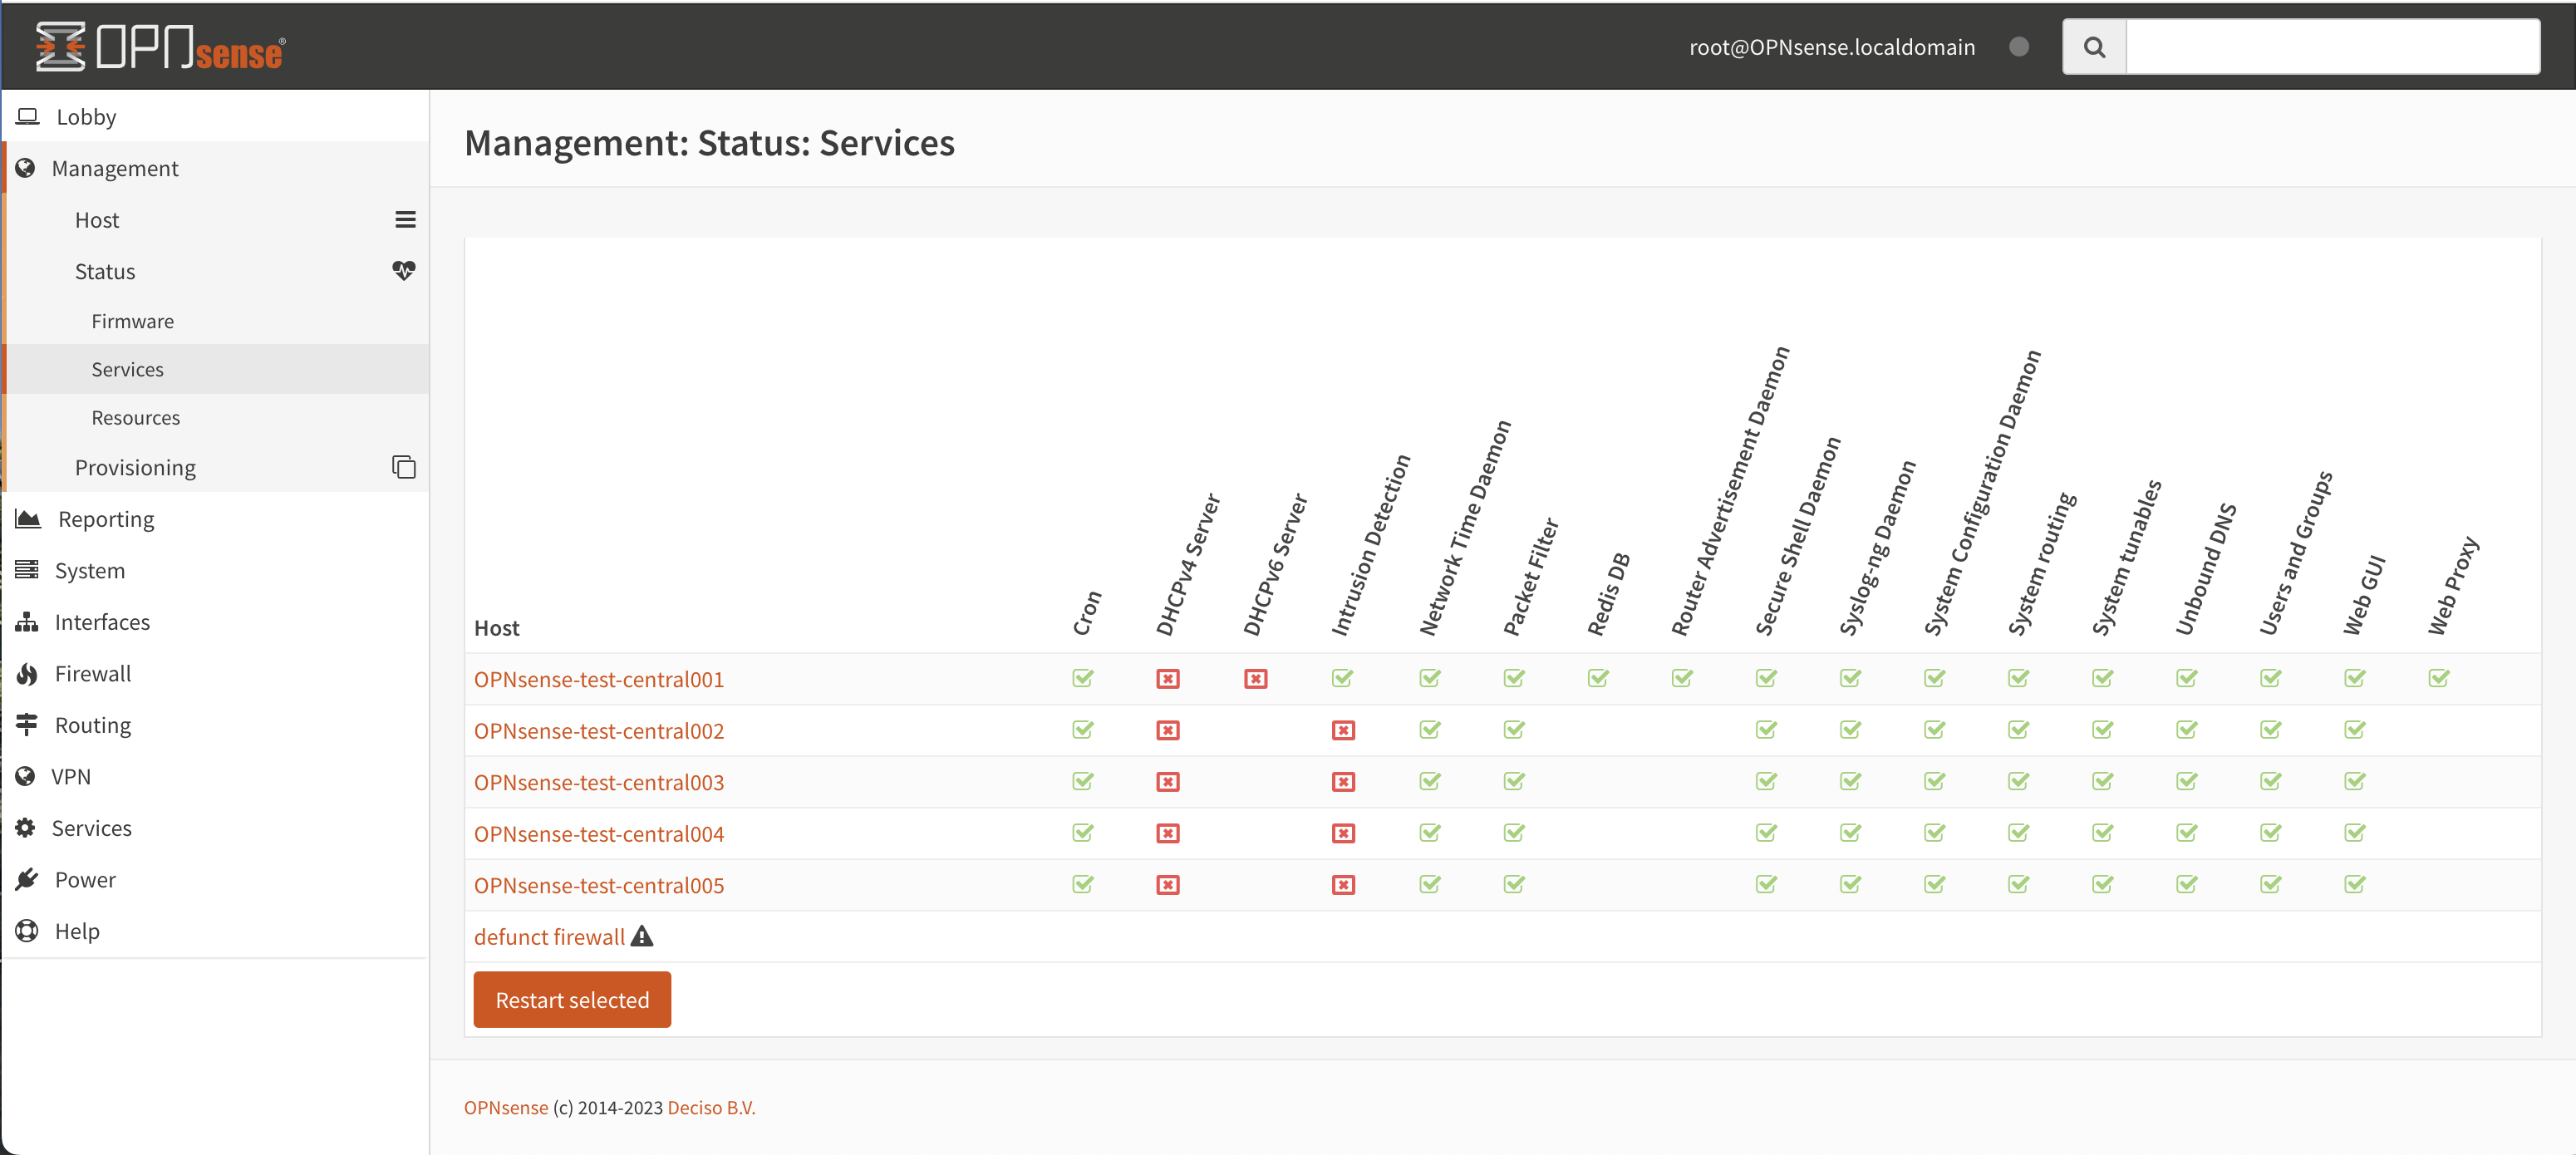
In the screenshot above there are 7 machines managed by OPNcentral, for every configured service there’s an icon reflecting the status of the service.
Stopped (inactive, but configured)Running (active)
Host unreachable or misconfigured
When you click one of the service icons, the icon changes into a checkbox which can be used to restart the selected services with the button below the table.
Tip
The link in the host column brings you directly into the service control page of the selected firewall.
Machine resource status
In order to gain insights into the managed machines there is a resource page available which queries all connected firewalls and reports aggregated status about them.
While collecting data for a machine there’s a spinner visible, as soon as information is collected you can view relevant information per node.

From left to right the following information is available:
Host information
Host name (description)
Version installed
Processor type
Most recent configuration change (tooltip uncovers who made the change and from which module)
General statistics
Current cpu usage (total percentage)
Total memory usage
Swap file usage
Total interfaces configured (up/down)
Aggregated HA status (when configured), MASTER when all interfaces are, BACKUP when at least one is demoted to BACKUP
Root file system usage
Gateway status including maximum delay
Firewall
State table usage
Alias usage (when over 100% the requested entries don’t fir in memory)
Source tracking table usage
Current traffic in/out, tooltip the piechart to show protocol name (or number) with current rate
Tip
When headings are underlined, a click brings you to the relevant module of the firewall in question.
Provisioning / sharing settings
The provisioning tool offers the ability to configure some settings in a more centralised manner. Inspired by the functionality that is offered for high-availability setups, you can distribute global settings among all connected firewalls for various configuration options. The central host acts as a template in this case.
In order to configure the settings that should be shared, you can configure the “classes” to synchronize in the host settings .
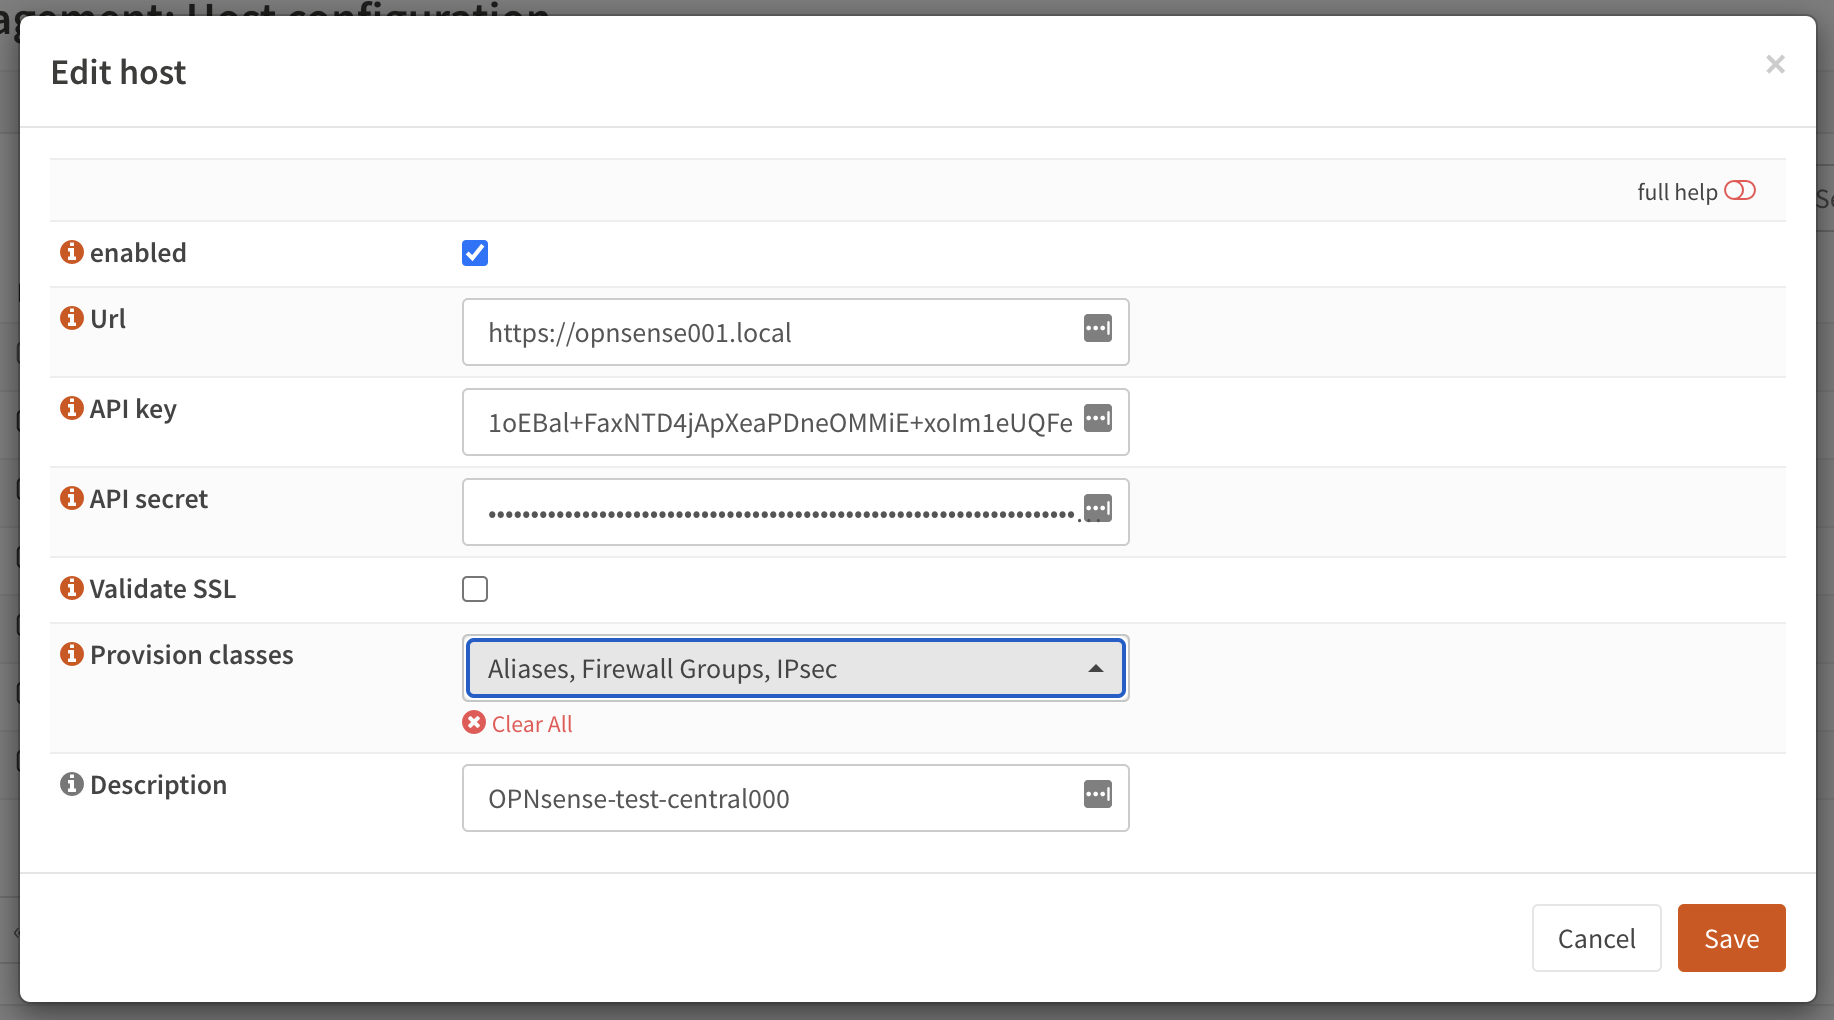
Here you will find the same options as are available under . After configuring the desired parameters, you can use the Provisioning page () to inspect status and push options to the attached firewalls.
Warning
Be very careful pushing settings to your connected firewall which may disconnect your session, such as firewall and routing related options. The central management host can’t predict if settings you plan to make lead to an inaccessible firewall.
Tip
Add OPNcentral - provision / reconfigure remote hosts in
with a daily schedule to automatically provision all attached firewalls on a daily basis.
All provisioning classes known by the management machine will be shown in the table, combined with the status of each section. OPNcentral calculates if settings are equal, keeps track of changes and restarts related services when needed.
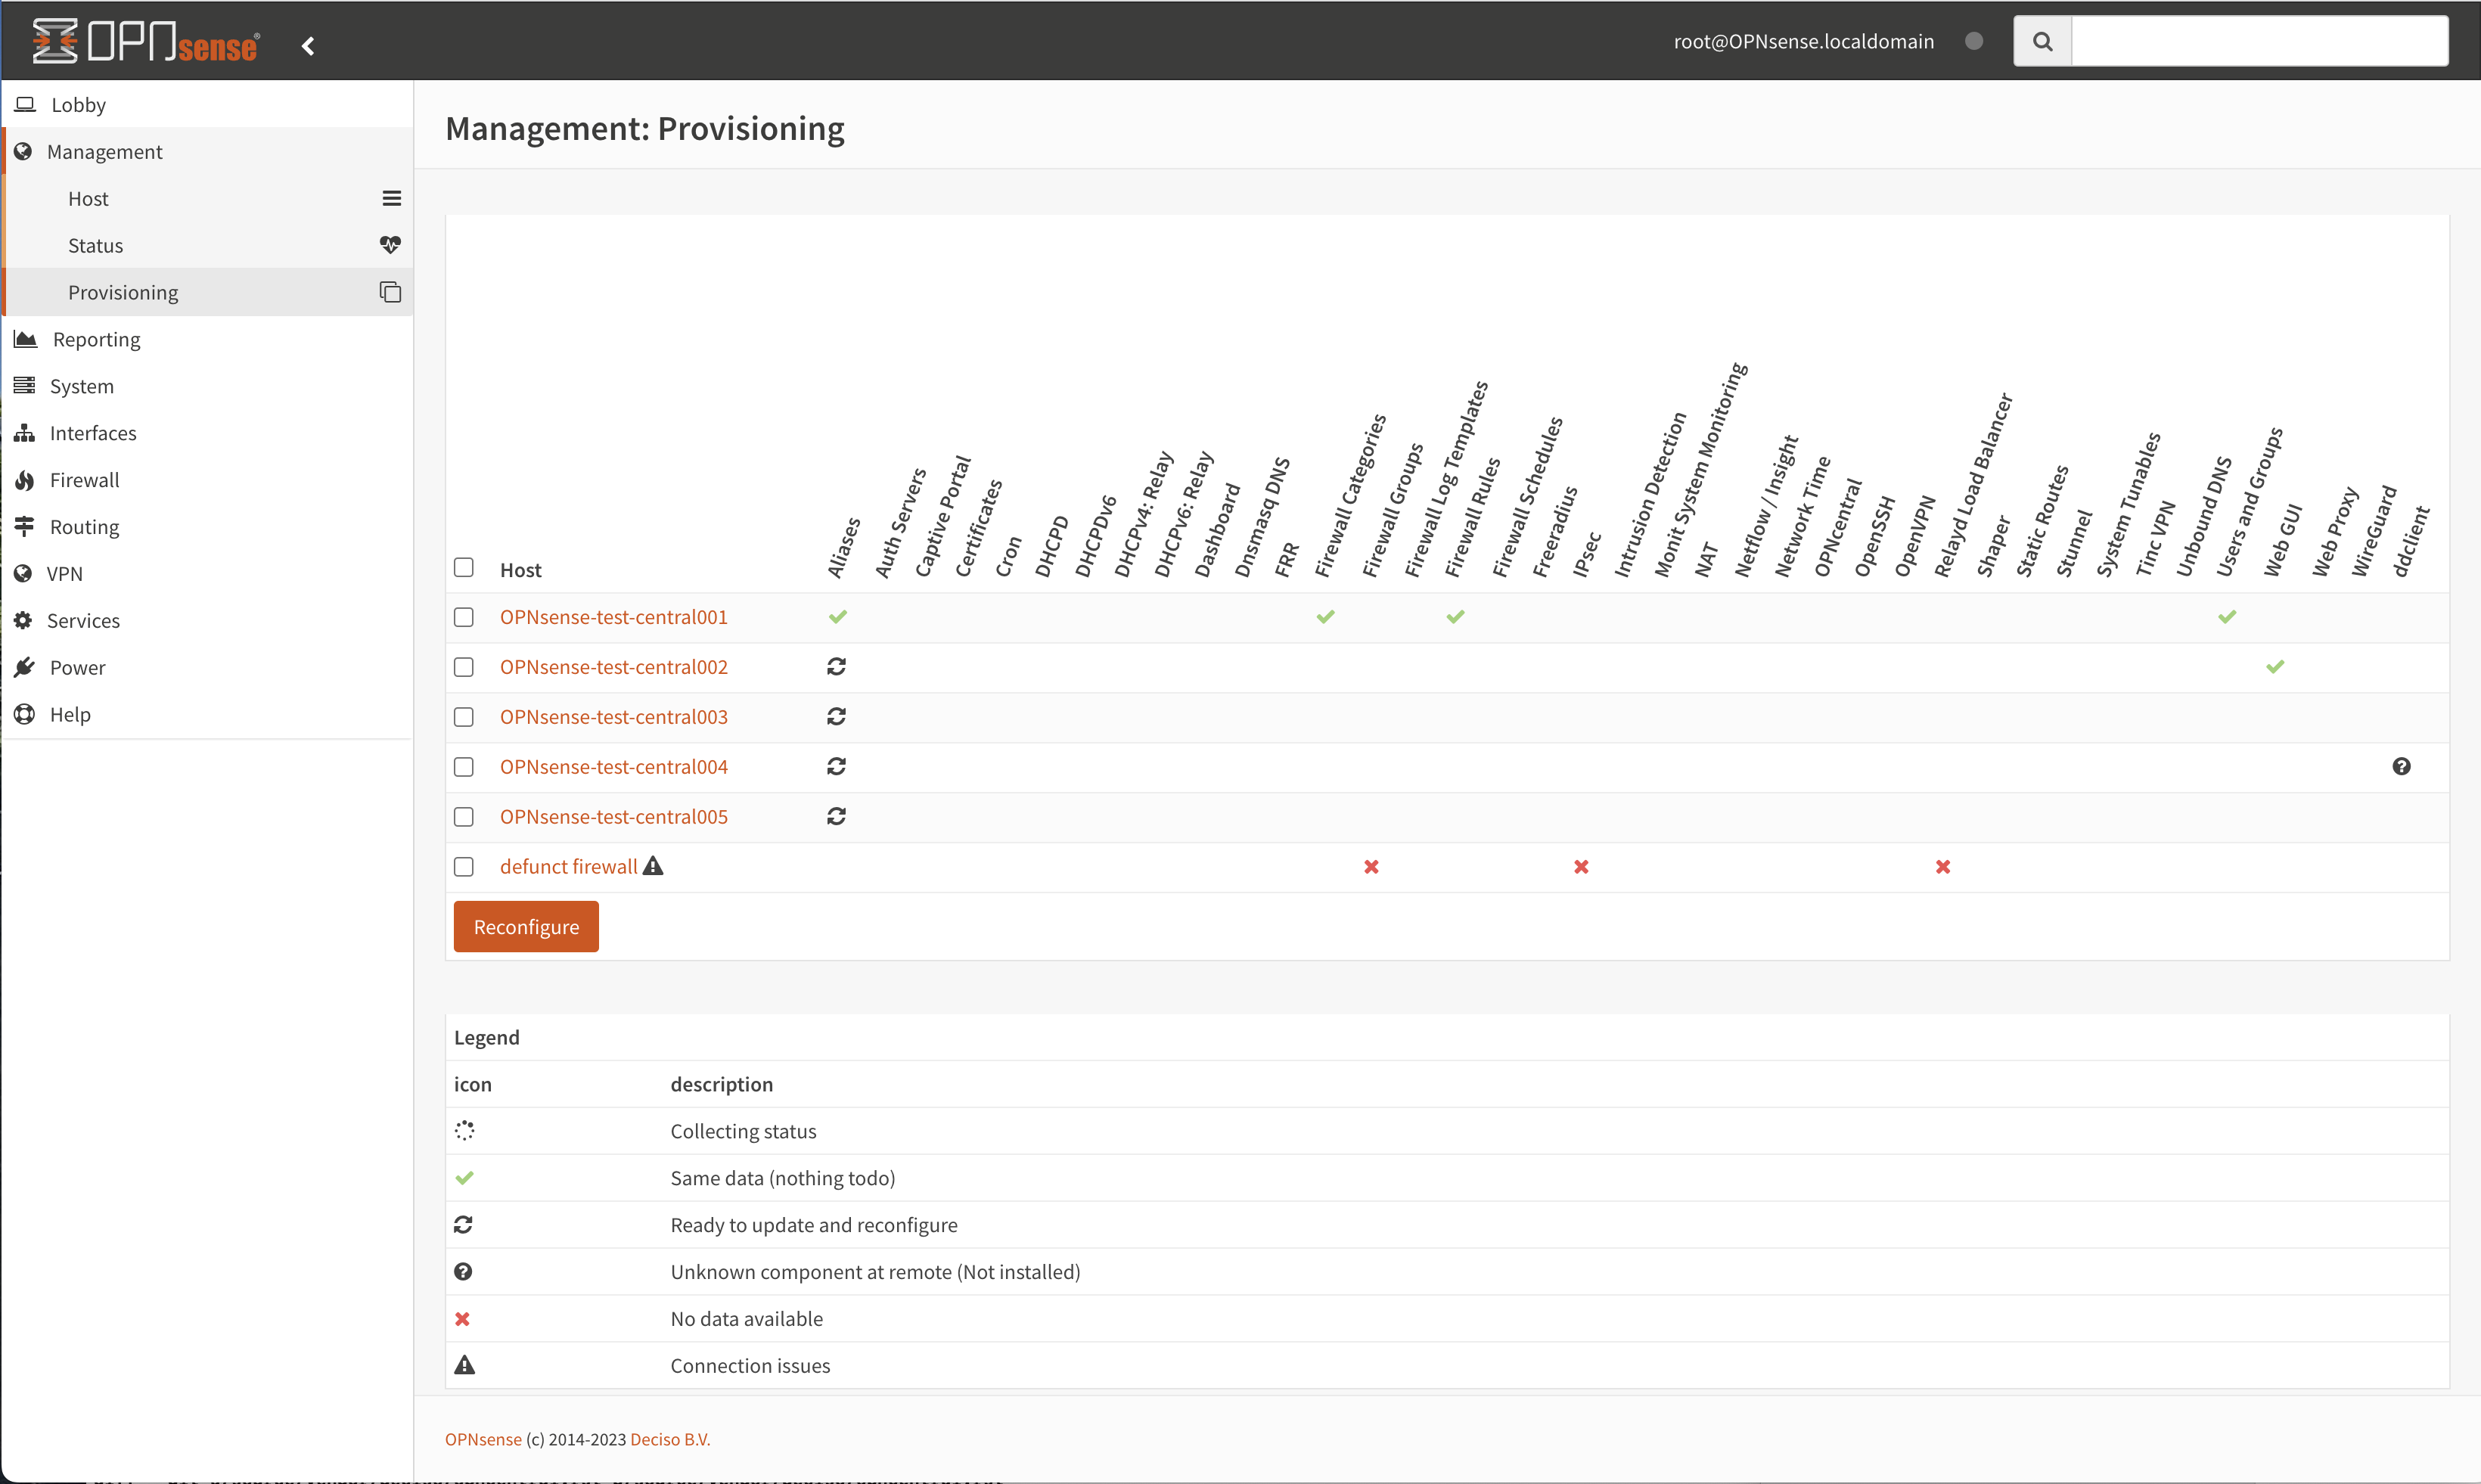
You can either selectlively reconfigure specific hosts with the checkbox or reconfigure all at once on command.
Collecting statusClass equals this machine (nothing todo)
Changes ready to commit
Unknown yet configured class
Unable to connect
Provisioning classes
By default merging configuration items from the central firewall overwrites the settings on the target machine, but in some cases we need a more practical approach to deal with local modifications.
In this chapter we are going to describe how classes with special implementations are being treated on synchronisation and how to utilise this behaviour to ease management.
Users & Groups
When users and groups are synchronized, the existing api key+secret is merged into the user with the same name to prevent access issues after reconfigure. To avoid issues, make sure there’s a unique username with proper credentials before using the synchronization.
Note
Although quite some setups will likely use external authentication options available in OPNsense, sometimes it’s practical to share the same user database among different firewalls. This option allows for sharing, without the need to sue the same key+secret on all connected firewalls.
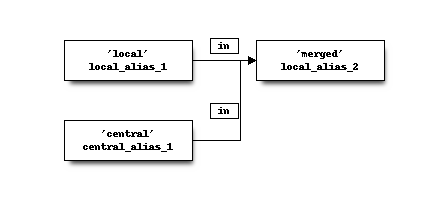
Aliases (Firewall)
Since various firewall sections depend on aliases, OPNcentral checks if aliases are used before removing local aliases from the remote firewall.
Due to this powerful feature, after synchronisation of the central aliases you can also use nesting to combine remote aliases into new local ones.
For example, when the local machine has local_alias_1 and the central location offers central_alias_1
when both are combined into local_alias_2 and local_alias_2 is used in firewall/nat rules it will
automatically merge central changes after a reconfigure action from the dashboard.
Note
As long as local_alias_2 is used, both local_alias_1 and local_alias_2 will be preserved after provisioning.
Firewall rules
Merging the firewall rules will keep the interfaces unaltered which don’t exists on the central node as these are being provided to the target firewall. In case you want to exclude some interfaces (for all remote firewalls), you can easily override the known interfaces in on the General settings tab.
Since there’s an explicit order in which different types of rules are being handled, you can choose if you want to prefer central rules being matched first or last depending on the type of “interface” to use.

Tip
When forcing interface groups to the backup node, these will precede interface rules such as LAN and WAN, when only sending over interface groups the remote firewall is able to allow traffic which would otherwise be rejected.
Note
When multiple interfaces are attached to a (floating) rule, these will be removed by the provisioning algorithm as the intend isn’t fully clear in these matters.
Note
Rules on the central node which do apply to all interfaces or a selection of interfaces are always being send to the remote firewall. When this isn’t intentional, best not use these options in the “floating” rules.
NAT (Firewall)
Merging the nat rules will keep the interfaces unaltered which don’t exists on the central node as these are being provided to the target firewall. In case you want to exclude some interfaces (for all remote firewalls), you can easily override the known interfaces in on the General settings tab.
Note
All NAT type rules (Port Forward, One-to-One, Outbound, NPTv6) are treated similar.
Note
When multiple interfaces are attached to a rule, which is possible for port forwards. These will be removed by the provisioning algorithm.
Note
Port forwarding rules on the central node which do apply on a selection of interfaces are always being send to the remote firewall. When this isn’t intentional, best prevent the usage of these forwards.
Firewall categories
Merging categories will preserve the ones that are currently used on the remote firewall.
WebGui (Administration)
To prevent breakage after synchronisation, the certificate used by the webgui will be preserved after synchronisation (or the one provided in the host configuration will be shipped).
Attention
Currently it’s not possible to merge certificates and webgui admin settings, as the certificate store will potentially be overwritten in that case.
Configuration Tutorials
In this section we will show example configurations of some of the features that OPNcentral Central Management offers.
Automatic WebGUI Login
For the automatic login feature to work, the following infrastructure is required:
- One OPNsense with Business Edition and OPNcentral installed, which will be used as the Central Host for configuration. Using this OPNsense for no other tasks than configuration and administration is recommended.
- One or several other OPNsense with Business Edition and OPNcentral installed, which will be managed by the Central Host.
- Either your own PKI (Public Key Infrastructure) or using the OPNsense provided one in
- A DNS infrastructure or public DNS provider, that manages the FQDNs (Full Qualified Domain Names) of each OPNsense
We assume that we have this example infrastructure:
FQDN |
IP Address |
Task |
|---|---|---|
|
203.0.113.1 |
Central Host for administration |
|
198.51.100.1 |
Firewall Node site A |
|
192.0.2.1 |
Firewall Node site B |
1. Add Firewall Nodes to the Central Host
- Go to .
- Follow the steps described here Register new hosts.
- If there are connection problems, check if the Central Host can resolve the FQDNs of the Firewall Nodes. They have to be added via their FQDN and not via IP address. Otherwise the SAN of the certificates will not match the FQDN.
Tip
When using a custom WebGUI port, specify the socket like this: https://node-a1.opnsense.local:8443
Note
Only add the Firewall Nodes to the Central Host. Do not add the Central Host to itself to prevent configuration loops.
2. Create a PKI on the Central Host
For more information read Setup Self-Signed Certificate Chains
- Go to and press + to Create an internal Certificate Authority.
- Leave all the populated fields on their default values.
- As State, City, Organization and Email Address, add your own.
- As Descriptive name and Common Name, use
opncentral-ca. - Press Save.
Note
Export the CA certificate, and import it into the Trusted Root Certificate Store of each client that should use the automatic WebGUI login. It will only work if the Browser trusts the connection.
3. Create Server Certificates for all Hosts
- Go to and press + to Create an internal Certificate.
- Leave all the populated fields on their default values.
- As Type choose Server Certificate.
- As Common Name and Alternative Names Type DNS (SAN) choose the FQDNs of the Firewall; e.g.,
central-host.opnsense.local - Press Save and repeat this until there are certificates for the Central Host and the Firewall Nodes.
4. Change WebGUI certificate of Central Host
- Go to .
- Make sure the Protocol is HTTPS and choose the certificate with the FQDN of the Central Host; e.g.,
central-host.opnsense.local - Press Save and press the link that appears, which will redirect the session to a new browser tab.
Note
The browser should automatically trust the connection to the Central Host now. If not, make sure the opncentral-ca certificate has been imported as described in Step 2. It is mandatory that the browser trust is established before continuing.
5. Provision Certificates and WebGUI to Firewall Nodes
- Go to .
- Select a Firewall Node, e.g.,
node-a1.opnsense.localand edit it. - Make sure that Validate SSL is not selected right now.
- Select the correct certificate in Push WebUI certificate, in this case
node-a1.opnsense.local - In Provision classes, select
Web GUI. Please be careful not to selectCertificates, onlyWeb GUIis needed as Provision classes. - Press Save and repeat the same for all other Firewall Nodes.
- Go to and select all Hosts, then press Reconfigure.
- After the provisioning has succeeded, go back to and enable Validate SSL for all Firewall Nodes.
6. Test the Automatic Login
- Go to and click on any of the Host links. An additional browser tab will open with the selected Firewall Node and the session is automatically logged in.
Tip
This feature is especially useful for Network Administrators that centrally manage a large amount of OPNsense Firewalls.