Stunnel
Stunnel in OPNsense can be used to forward tcp connections securely using TLS mutual authentication. Although the application itself supports authentication based on pre-shared keys, our plugin only supports certificate based authentication, which is more secure but comes with more (connect) overhead (https://www.stunnel.org/perf.html).
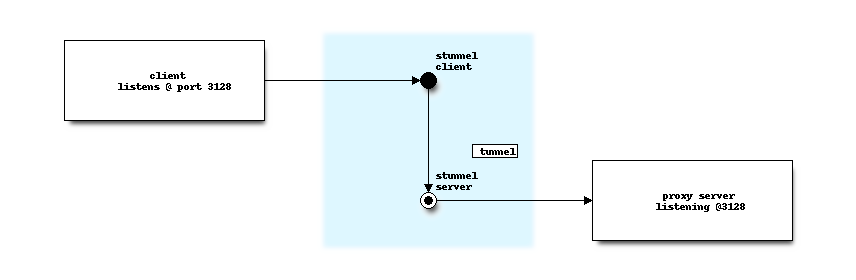
The above diagram shows the basic functionality as provided by this plugin, the client part (not delivered by this plugin) connects to the server at a predefined port and starts forwarding local received packets to the other end of the tunnel.
Securing http proxy traffic is one of the more common use-cases of stunnel.
Prerequisites
Before setting up our new secured tunnel, we need to make sure we have a Certificate Authority available together with certificates which can be used for both ends of the tunnel.
The simplest way to create a CA is to use an internal self signed one, which you can do in , choose “Create an internal Certificate Authority” as method and fill in all the details.
When you have a CA available, you can create a certificate for the server (this machine) and the client. Just go to and create an internal certificate, choose the right type (server for this end of the tunnel) and select the created CA from the previous step. The common name identifies both ends of the tunnel, you can choose a fully qualified domain name here for the server and a username for the client (for example).
For more information read Setup Self-Signed Certificate Chains
Note
The example setup assumes a proxy server is already configured and functional.
Note
The plugin itself can be installed using the menu (search for stunnel).
Configure the server
To add a new tunnel, go to and click the [+] to add a new record.
- Listen address
The address to listen on, we generally advice to use a loopback interface here and forward traffic to it using a Destination NAT (Port Forward). Leave this default (127.0.0.1) for our example.
Note
When choosing a non loopback interface, make sure to use a static one.
- Listen port
The portnumber to listen on (where the stunnel client connects to). For our example we choose
31280here.- Target hostname
The hostname or ip number of the service to connect to, for this example the internal ip address of the proxy server.
- Target port
Port the service uses, in this case it would be
3128(the default squid proxy port)- Certificate
This servers certificate, select the one created for the server in the prerequisites.
- CA to validate connections to
Certificate authority to use, this stunnel will only accept connections which use a certificate issued by the same CA.
- enable CRL
Enable certificate revocation lists, when selected a CRL with the format XXXXXXXX.r0 is required in the (
/var/run/stunnel/certs/) directory. If certificates are managed from this machine, all attached CRLs will be generated automatically. For more information about this option, see CRLpath in stunnels manual.
Warning
If configured and a valid CRL is not available, all connections will be denied. Additions may need a restart of stunnel (when the certificate was already used).
- Description
Enter a user friendly description here to identify this tunnel, something like “corporate proxy”
Tip
To forward traffic to the loopback address from your wan interface, go to
and add a new rule with the following settings: Interface WAN, Protocol TCP, Destination WAN address,
Destination port range 31280, Redirect target IP 127.0.0.1 and Redirect target port 31280
Note
For additional security you can enable chroot mode in , there is
however a downside in using this feature. If for some reason the system logging facility (syslog) is restarted, stunnel
will loose connection to that facility, causing a lack of visibility afterwards.
Configure the client
Before configuring the client, make sure to install stunnel for your platform, download the public key of your CA and the certificate created for this client.
[proxy]
client = yes
accept = 127.0.0.1:3128
connect = our.opnsense.address:31280
requireCert = yes
verifyChain = yes
cert = /path/to/client.pem
CAfile = /path/to/ca.pem
Note
client.pem contains both the public and private key part of this clients certificate.
Test
When the tunnel connection is established, you should be able to connect to 127.0.0.1:3128 on the connecting machine
using your browsers proxy settings.
Enable Identd
Our stunnel plugin is packed with an additional service providing an ident (RFC 1413) protocol service. This service depends on a custom patch we ship in stunnel, making sure authenticated TLS sessions are logged properly, so our ident service can filter them to track a user that belongs to an stunnel session.
When a TLS session is authenticated, a log record like the one below will be send to syslog.
stunnel: LOG5[xxxxx]: IDENT Service [xx-xx-xx-xx-xx] from 127.0.0.2:11446 --> C=NL, ST=Zuid-Holland, L=Middelharnis, O=OPNsense, emailAddress=contact_at_domain, CN=test_client.opnsense.local
Our ident service interprets this as 127.0.0.2 connected using source port 11446 as test_client.opnsense.local (only the CN part is returned)
Note
Since our indent services binds to 0.0.0.0:113 it’s not compatible with other ident services likely using the same port,
it also highly advisable to deny access to this services from other hosts than the consumers of this service (which is usually the firewall itself).
This functionality can easily be validated using two telnet sessions, one from the stunnel client keeping a session open, the other connecting to the same host using ident. The example log line above would result in the following request/response scenario:
# telnet 127.0.0.2 113
Trying 127.0.0.2...
Connected to OPNsense.localdomain.
Escape character is '^]'.
11446,3128
11446, 3128 : USERID : OTHER : test_client.opnsense.local
Connection closed by foreign host.
Note
Please note the 127.0.0.2 host is the same as the service connecting to was running on, using a different address
attached to the same firewall would result in a NO-USER error.