Setup SSL VPN site to site tunnel
Site to site VPNs connect two locations with static public IP addresses and allow traffic to be routed between the two networks. This is most commonly used to connect an organization’s branch offices back to its main office, so branch users can access network resources in the main office.
Index
Before you start
Before starting with the configuration of an OpenVPN SSL tunnel you need to have a working OPNsense installation with a unique LAN IP subnet for each side of your connection (your local network needs to be different than that of the remote network).
Note
For the sample we will use a private IP for our WAN connection. This requires us to disable the default block rule on WAN to allow private traffic. To do so, go to and uncheck “Block private networks”. (Don’t forget to save and apply)

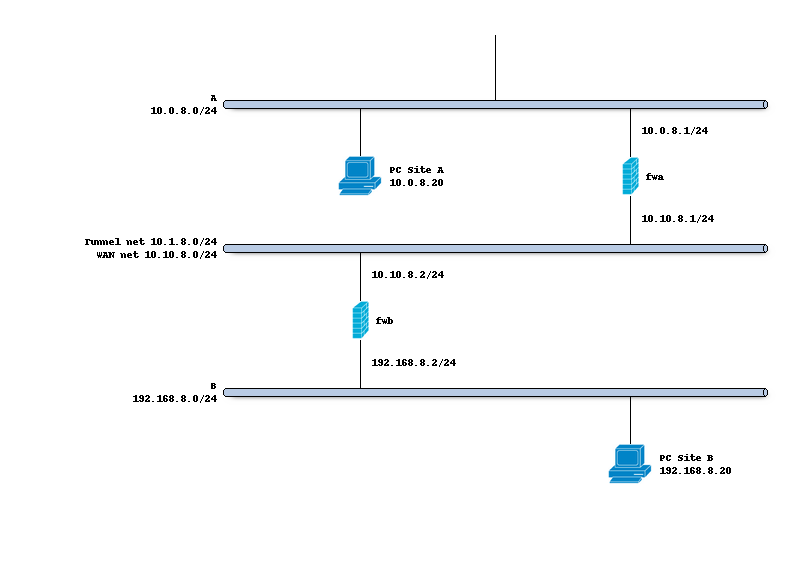
Network topology
The schema below describes the situation we are implementing. Two networks (A,B) and a transit network (10.10.8.0/24)
to peer both firewalls. We will create a tunnel network 10.1.8.0/24 between both sites.
Preparations
Trust
In order to setup a tunnel on both ends, we need to configure certificates to warrant trust between both machines. We need a root CA that issues two leaf certificates, one for each site.
Create a certificate chain using the following tutorial:
Setup Self-Signed Certificate Chains
Root CA:
SSL VPN CALeaf Certificate - Type Server - Site B: Set the Common Name to the FQDN of this machine.
Leaf Certificate - Type Client - Site A: Set the Common Name to the username.
The root CA issues the leaf certificates directly; we do not need an intermediate CA.
Note
It is best practice to offer each user their own certificate using the same common name as the username, although it is also possible for clients to share a certificate. When adding a certificate from the user manager the CN is automatically set to its name. In this example we will only authenticate using the certificate, no additional user or password will be required.
Static keys
We create a static key and define it’s use in , for this example select auth as mode and click the gear button to generate one. Provide a description for this key.
Prepare Site A
Copy the public part of the certificate authority to the firewall at Site A (use the download button and copy the contents into a new CA on this host)
Copy the public and private part of the client certificate into a new one on Site A
Copy the contents of the static key to a new entry and select the same type
Create a server instance (Site B)
Now the generic setup is done, we can configure a new server type instance via
Property |
site B |
|---|---|
Role |
Server |
Description |
MyServer |
Protocol |
UDP (IPv4) |
Port number |
1194 |
Bind address |
10.10.8.2 1 |
Server (IPv4) |
10.1.8.0/24 (the tunnel network used) |
Certificate |
choose the prepared server certificate |
TLS static key |
choose the prepared static key |
Local Network |
192.168.8.0/24 |
Remote Network |
10.0.8.0/24 2 |
Note 1
Leave empty to bind to all addresses assigned to this machine or use a loopback address combined with a Destination NAT (Port Forward) when the external address is not static.
Note 2
The network(s) served by this openvpn instance, after startup routes will be created. In order to bind the network to the correct client a Client Specific Overwrite is also needed.
Hit the apply button when the instance is configured and add a client specific overwrite in
Property |
site B |
|---|---|
Servers |
leave empty or select our server |
Common name |
test-client |
Remote Network |
10.0.8.0/24 1 |
Note 1
The remote network bound to this common name, without this entry the traffic will not be routed between hosts.
Next go to and add a rule to allow traffic on port 1194/UDP from the other
host. At minimum we should add a rule similar to this one:
Property |
site B |
|---|---|
Interface |
WAN |
Protocol |
UDP |
Destination port range |
1194 |
Finally we are going to allow traffic on the tunnel itself by adding a rule to , for this example we keep it simple and add one to allow all, in which case we can save the defaults when adding a rule.
Create a client instance (Site A)
With the server in place it’s time to setup the client on OPNsense, for this we go to and add a new instance using the following settings.
Property |
site A |
|---|---|
Role |
Client |
Description |
MyClient |
Protocol |
UDP (IPv4) |
Remote |
10.10.8.2 |
Certificate |
choose the prepared client certificate |
TLS static key |
choose the prepared static key |
Remote Network |
192.168.8.0/24 |
Test connectivity
Use the page to watch the status of both server and client, when passing traffic over the link on both ends the counters should increase.
Now try to ping from Site A (10.0.8.20) to Site B (192.168.8.20).