IPsec - Site to Site tunnel
Site to site VPNs connect two locations with static public IP addresses and allow traffic to be routed between the two networks. This is most commonly used to connect an organization’s branch offices back to its main office, so branch users can access network resources in the main office.
Before you start
Before starting with the configuration of an IPsec tunnel you need to have a working OPNsense installation with a unique LAN IP subnet for each side of your connection (your local network need to be different than that of the remote network).
Note
For the sample we will use a private IP for our WAN connection. This requires us to disable the default block rule on wan to allow private traffic. To do so, go to and uncheck “Block private networks”. (Dont forget to save and apply)

Sample Setup
For the sample configuration we use two OPNsense boxes to simulate a site to site tunnel, with the following configuration:

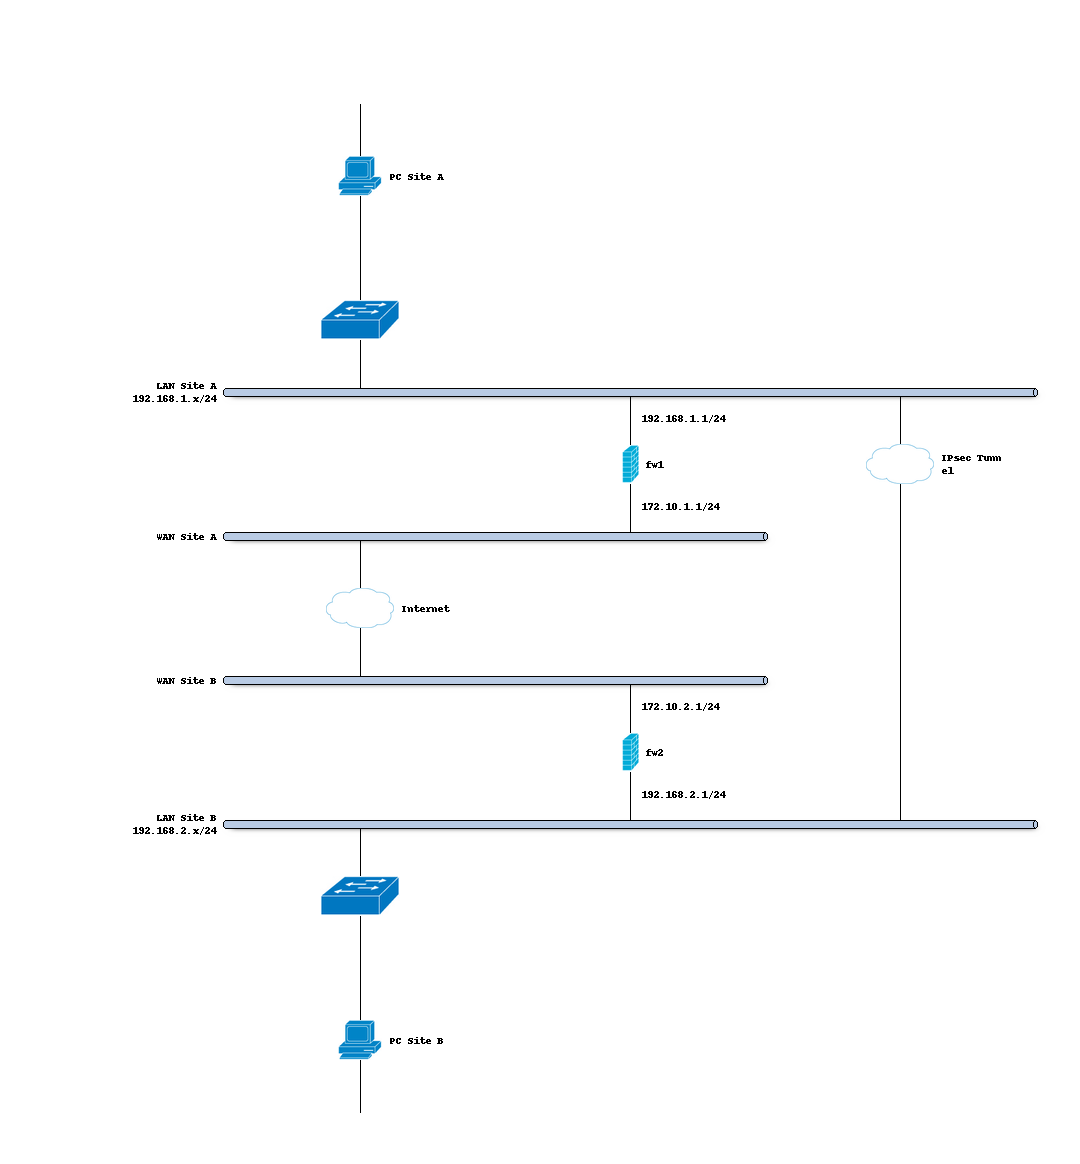
Site A
Hostname |
fw1 |
WAN IP |
172.10.1.1/24 |
LAN Net |
192.168.1.0/24 |
LAN IP |
192.168.1.1/24 |
LAN DHCP Range |
192.168.1.100-192.168.1.200 |
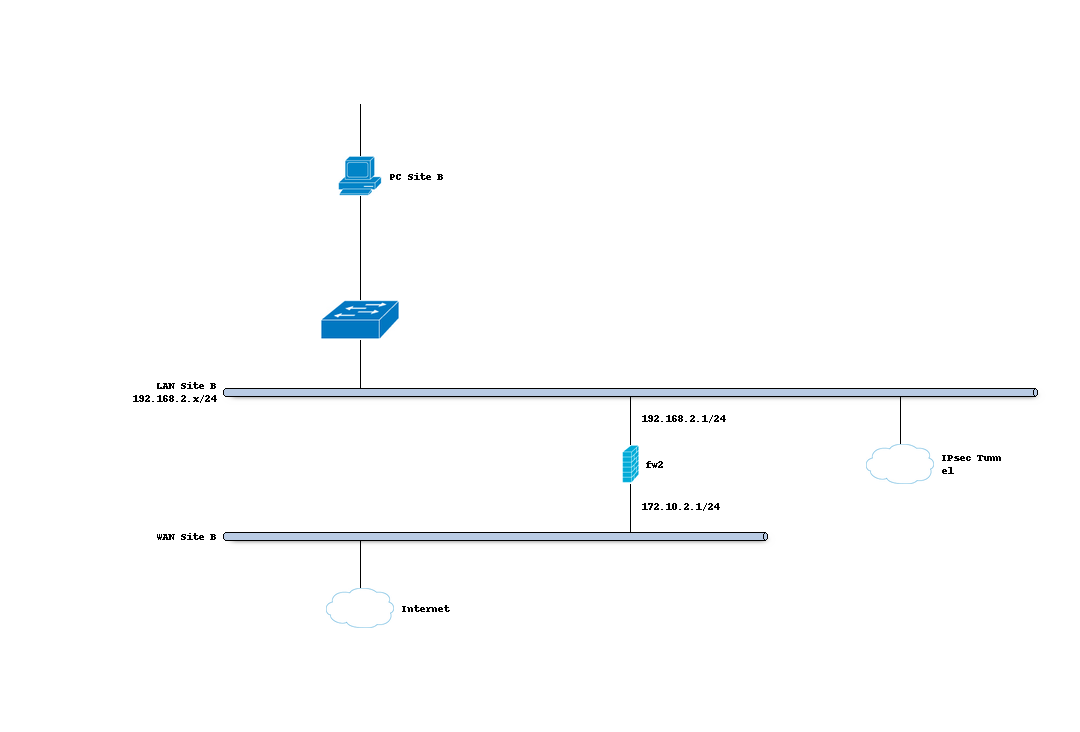
Site B
Hostname |
fw2 |
WAN IP |
172.10.2.1/24 |
LAN Net |
192.168.2.0/24 |
LAN IP |
192.168.2.1/24 |
LAN DHCP Range |
192.168.2.100-192.168.2.200 |
Firewall Rules Site A & Site B (part 1)
To allow IPsec Tunnel Connections, the following should be allowed on WAN for on sites (under ):
Protocol ESP
UDP Traffic on Port 500 (ISAKMP)
UDP Traffic on Port 4500 (NAT-T)

Note
You can further limit the traffic by the source IP of the remote host.
Step 1 - Phase 1 Site A
(Under Press +) We will use the following settings:
General information
Connection method |
default |
default is ‘Start on traffic’ |
Key Exchange version |
V2 |
|
Internet Protocol |
IPv4 |
|
Interface |
WAN |
choose the interface connected to the internet |
Remote gateway |
172.10.2.1 |
the public IP address of your remote OPNsense |
Description |
Site B |
freely chosen description |
Phase 1 proposal (Authentication)
Authentication method |
Mutual PSK |
Using a Pre-shared Key |
My identifier |
My IP address |
Simple identification for fixed ip |
Peer identifier |
Peer IP address |
Simple identification for fixed ip |
Pre-Shared Key |
At4aDMOAOub2NwT6gMHA |
Random key. CREATE YOUR OWN! |
Phase 1 proposal (Algorithms)
Encryption algorithm |
AES |
For our sample we will Use AES/256 bits |
Hash algorithm |
SHA512 |
Use a strong hash like SHA512 |
DH key group |
14 (2048 bit) |
2048 bit should be sufficient |
Lifetime |
28800 sec |
lifetime before renegotiation |
Advanced Options
Disable Rekey |
Unchecked |
Renegotiate when connection is about to expire |
Disable Reauth |
Unchecked |
For IKEv2 only re-authenticate peer on rekeying |
NAT Traversal |
Disabled |
For IKEv2 NAT traversal is always enabled |
Dead Peer Detection |
Unchecked |
Save your setting by pressing:

Now you should see the following screen:
Step 2 - Phase 2 Site A
Press the button + in front of the phase 1 entry to add a new phase 2.
General information
Mode |
Tunnel IPv4 |
Select Tunnel mode |
Description |
Local LAN Site B |
Freely chosen description |
Local Network
Local Network |
LAN subnet |
Route the local LAN subnet |
Remote Network
Type |
Network |
Route a remote network |
Address |
192.168.2.0/24 |
The remote LAN subnet |
Phase 2 proposal (SA/Key Exchange)
Protocol |
ESP |
Choose ESP for encryption |
Encryption algorithms |
AES / 256 |
For the sample we use AES 256 |
Hash algorithms |
SHA512 |
Choose a strong hash like SHA512 |
PFS Key group |
14 (2048 bit) |
Not required but enhanced security |
Lifetime |
3600 sec |
Save your setting by pressing:
Enable IPsec for Site A, Select:
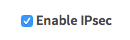
Save:
And Apply changes:


You are almost done configuring Site A (only some firewall settings remain, which we’ll address later). We will now proceed setting up Site B.
Step 3 - Phase 1 Site B
(Under Press +) We will use the following settings:
General information
Connection method |
default |
default is ‘Start on traffic’ |
Key Exchange version |
V2 |
|
Internet Protocol |
IPv4 |
|
Interface |
WAN |
choose the interface connected to the internet |
Remote gateway |
172.10.1.1 |
the public IP address of your remote OPNsense |
Description |
Site A |
freely chosen description |
Phase 1 proposal (Authentication)
Authentication method |
Mutual PSK |
Using a Pre-shared Key |
My identifier |
My IP address |
Simple identification for fixed ip |
Peer identifier |
Peer IP address |
Simple identification for fixed ip |
Pre-Shared Key |
At4aDMOAOub2NwT6gMHA |
Random key. CREATE YOUR OWN! |
Phase 1 proposal (Algorithms)
Encryption algorithm |
AES |
For our sample we will Use AES/256 bits |
Hash algorithm |
SHA512 |
Use a strong hash like SHA512 |
DH key group |
14 (2048 bit) |
2048 bit should be sufficient |
Lifetime |
28800 sec |
lifetime before renegotiation |
Advanced Options
Disable Rekey |
Unchecked |
Renegotiate when connection is about to expired |
Disable Reauth |
Unchecked |
For IKEv2 only re-authenticate peer on rekeying |
NAT Traversal |
Disable |
For IKEv2 NAT traversal is always enabled |
Dead Peer Detection |
Unchecked |
Save your setting by pressing:
Now you should see the following screen:

Step 4 - Phase 2 Site B
Press the button + in front of the phase 1 entry to add a new phase 2.
General information
Mode |
Tunnel IPv4 |
Select Tunnel mode |
Description |
Local LAN Site A |
Freely chosen description |
Local Network
Local Network |
LAN subnet |
Route the local LAN subnet |
Remote Network
Type |
Network |
Route a remote network |
Address |
192.168.1.0/24 |
The remote LAN subnet |
Phase 2 proposal (SA/Key Exchange)
Protocol |
ESP |
Choose ESP for encryption |
Encryption algorithms |
AES / 256 |
For the sample we use AES 256 |
Hash algorithms |
SHA512 |
Choose a strong hash like SHA512 |
PFS Key group |
14 (2048 bit) |
Not required but enhanced security |
Lifetime |
3600 sec |
Save your setting by pressing:
Enable IPsec for Site B, Select:
Save:
And Apply changes:
Firewall Rules Site A & Site B (part 2)
To allow traffic passing to your LAN subnet you need to add a rule to the IPsec interface (under ).

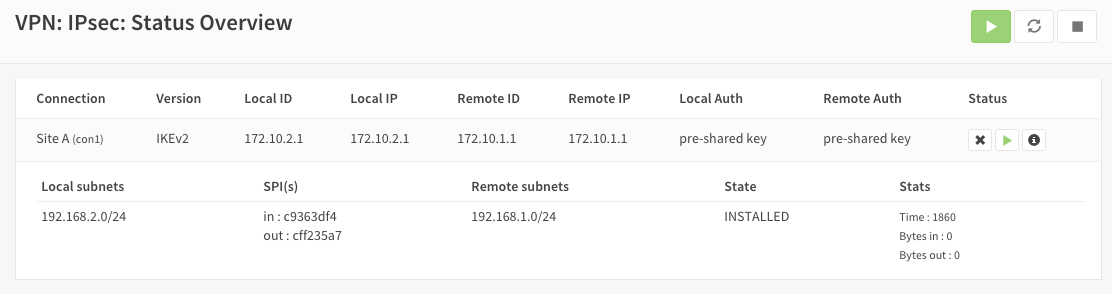
IPsec Tunnel Ready
The tunnel should now be up and routing the both networks. Go to to see current status. Press on the (i) to see the details of the phase 2 tunnel(s), like this:
Note
If the tunnel did not come up, try to restart the service on both ends.
Sample configuration
For test purposes we used two OPNsense boxes integrated into one unit and a cross-cable between the WAN ports.
To route traffic the WAN interfaces have been configured to use a /16 segment and they are each others default gateway. Other than that the sample is equal to this how-to.
- Configuration Site A
- Configuration Site B
Trouble shooting
Phase 1 won’t come up
That is a difficult one. First check you firewall rules to see if you allow the right ports and protocols (ESP, UDP 500 & UDP 4500) for the WAN interface.
Check your ipsec log to see if that reveals a possible cause.
Common issues are unequal settings. Both ends must use the same PSK and encryption standard.
Phase 1 works but no phase 2 tunnels are connected
Did you set the correct local and remote networks. A common mistake is to fill in the IP address of the remote host instead of its network ending with x.x.x.0
Common issues are unequal settings. Both ends must use the same encryption standard.
Note
If you are testing locally with your pc connected to one of the two test boxes as in the sample configuration, then make sure you have no other network connections (Wi-Fi, for example).