IPsec: Setup OPNsense for IKEv1 using XAuth
XAuth was an addition to IKEv1 supporting user authentication credentials additionally to pre-shared keys or certificates. There are three different types supported by OPNsense which we will describe here.
Mutual PSK + XAuth: You define a pre-shared key which is the same for every user and after securing the channel the user authentication via XAuth comes into play. Mutual RSA + XAuth: Instead of using a pre-shared key, every device needs a client certificate to secure the connection plus XAuth for authentication. This is the most secure variant for IKEv1/XAuth but also with the most work to do. Hybrid RSA + XAuth: Hybrid RSA is the same as Mutual, without the need for a client certificate. Only the server will be authenticated (like using HTTPS) to prevent man-in-the-middle attacks like with Mutual PSK. It is more secure than PSK but does not need the complete roll-out process like with Mutual RSA.
We assume you have read the first part at Road Warriors - Setup Remote Access
Step 1 - Create Certificates (only for RSA variants)
For Mutual RSA + XAuth and Hybrid RSA + XAuth you need to create a Root CA and a server certificate for your Firewall.
For more information read Setup Self-Signed Certificate Chains
Step 2 - Mobile Clients
First we will need to setup the mobile clients network and authentication source. Go to
For our example will use the following settings:
IKE Extensions
Enable |
checked |
check to enable mobile clients |
User Authentication |
Local Database |
For the example we use the Local Database |
Group Authentication |
none |
Leave on none |
Virtual Address Pool |
10.10.0.0/24 |
Enter the IP range for the remote clients |
You can select other options, but we will leave them all unchecked for this example.
Save your settings and select Create Phase1 when it appears. Then enter the Mobile Client Phase 1 setting.
Step 3 - Phase 1 Mobile Clients
Phase 1 General information
Connection method |
default |
default is ‘Start on traffic’ |
Key Exchange version |
V1 |
XAuth only works on V1 |
Internet Protocol |
IPv4 |
|
Interface |
WAN |
choose the interface connected to the internet |
Description |
MobileIPsec |
freely chosen description |
Phase 1 proposal (Authentication)
Authentication method |
XAuth |
Choose one of the three available options |
Negotiation mode |
Main Mode |
Use Main Mode here |
My identifier |
Distinguished Name |
Set the FQDN you used within certificate, for PSK use “My IP address” |
Pre-shared Key |
Shared secret |
For Mutual PSK + XAuth use this PSK, otherwise certificate below |
My Certificate |
Certificate |
Choose the certificate from dropdown list, only valid for RSA variants |
Phase 1 proposal (Algorithms)
Encryption algorithm |
AES |
For our example we will use AES/256 bits |
Hash algorithm |
SHA1, SHA256 |
SHA1 and SHA256 for compatibility |
DH key group |
1024, 2048 bit |
1024 and 2048 bit for compatibility |
Lifetime |
28800 sec |
lifetime before renegotiation |
Advanced Options are fine by default.
Save your settings.
Step 3 - Phase 2 Mobile Clients
Press the button + in front of the phase 1 entry to add a new phase 2.
General information
Mode |
Tunnel IPv4 |
Select Tunnel mode |
Description |
MobileIPsecP2 |
Freely chosen description |
Local Network
Local Network |
LAN subnet |
Route the local LAN subnet |
Phase 2 proposal (SA/Key Exchange)
Protocol |
ESP |
Choose ESP for encryption |
Encryption algorithms |
AES / 256 |
For this example we use AES 256 |
Hash algorithms |
SHA1, SHA256 |
Same as before, mix SHA1 and SHA256 |
PFS Key group |
off |
Most mobile systems do not support PFS in Phase2 |
Lifetime |
3600 sec |
Save your settings and Enable IPsec, Select:
Note
If you already had IPsec enabled and added Road Warrior setup, it is important to restart the whole service via services widget in the upper right corner of IPSec pages or via since applying configuration only reloads it, but a restart also loads the required modules of strongSwan.
Step 4 - Add IPsec Users
Go to and press the + sign in the lower right corner to add a new user.
Enter the following into the form:
User Name |
expert |
Password |
&test!9T |
Save to apply.
Step 5 - Add client certificate (for Mutual RSA)
This step is only needed for Mutual RSA + XAuth!
Go to and create a new client certificate. Just click Add, choose your CA and probably increase the lifetime. Everything else besides the CN can be left default. Give a Common Name and Save. Download the newly created certificate as PKCS12 and export it to you enduser device.
Step 6 - Configure Client
To illustrate the client setup we will look at the configuration under macOS, including some screenshots. The configurations for Android and iOS will be settings only.
Note
Configuration samples listed here where created using latest macOS, iOS and Android devices on time of publication in February 2016.
Configure macOS Client
Start with opening your network settings ( and Add a new network by pressing the + in the lower left corner.
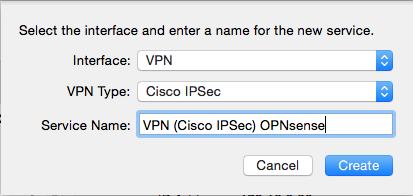
Now select VPN and Cisco IPSec, give your connection a name and press Create.
Now enter the details for our connection:
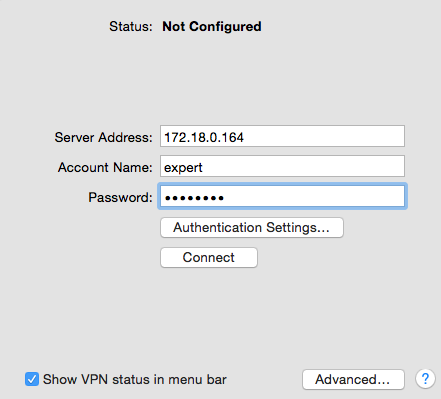
Next press Authentication Settings to add the group name and pre-shared key.
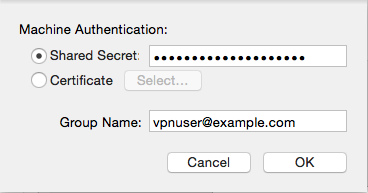
Press OK to save these settings and then Apply to apply them.
Now test the connection by selecting it from the list and hit Connect.

Done
Configure iOS Client
To add a VPN connection on an iOS device go to . Select Add VPN Configuration chose IPsec and use the Following Settings:
Description |
IPsec OPNsense |
Freely chosen description |
Server |
172.18.0.164 |
Our server address |
Account |
expert |
Username of the remote account |
Password |
&test!9T |
Leave blank to be prompted every time |
Preshared IPsec-key |
At4aDMOAOub2NwT6gMHA |
Our PSK |
Configure Android Client
To add a VPN connection on an Android device go to , select VPN. Press the + in the top right corner to add a new VPN connection.
Use the Following Settings:
Name |
IPsec OPNsense |
Freely chosen name |
Type |
IPSec Xauth PSK |
As configured in OPNsense |
Server address |
172.18.0.164 |
Our server address |
Preshared IPsec-key |
At4aDMOAOub2NwT6gMHA |
Our PSK |
Save and try connecting. To connect enter Username and Password for the user expert we created in this example.